Virtual Stock (Edge)
An employee must be assigned to the shop with a Shop Owner Admin role to perform actions referred to in this article.
This guide explains how to configure the ShopCtrl integration app module with VirtualStock (now part of Edge by Ascential). VirtualStock is a modular SaaS platform that facilitates collaboration between retailers and their suppliers. The integration connects ShopCtrl to VirtualStock's Supplier API, enabling seamless data exchange for:
- Importing new orders
- Updating tracking numbers for shipped orders
- Providing shipping dates for backordered items
- Synchronizing inventory levels
Setting up the integration with Virtual Stock (Edge)
VirtualStock manages API access - you may need to contact their support team to obtain credentials (Client ID and Client secret).
You'll need:
- Sandbox credentials (for testing)
- Production credentials (after UAT completion)
Configuring Shop Synchronization in ShopCtrl
The setup process consists of three steps. Before proceeding, create a new Virtual Stock shop: Create Shop
Virtual Stock (Edge) shop configuration
Step 1. Connect to Virtual Stock (Edge)
The connection process is the same for both sandbox and production - only the "Use sandbox environment" checkbox determines the target environment.
- Log in to your ShopCtrl account as a user with the Shop Owner Admin role.
- Navigate to Configuration > Shops.
- Select the desired shop and click Edit to open the shop settings.
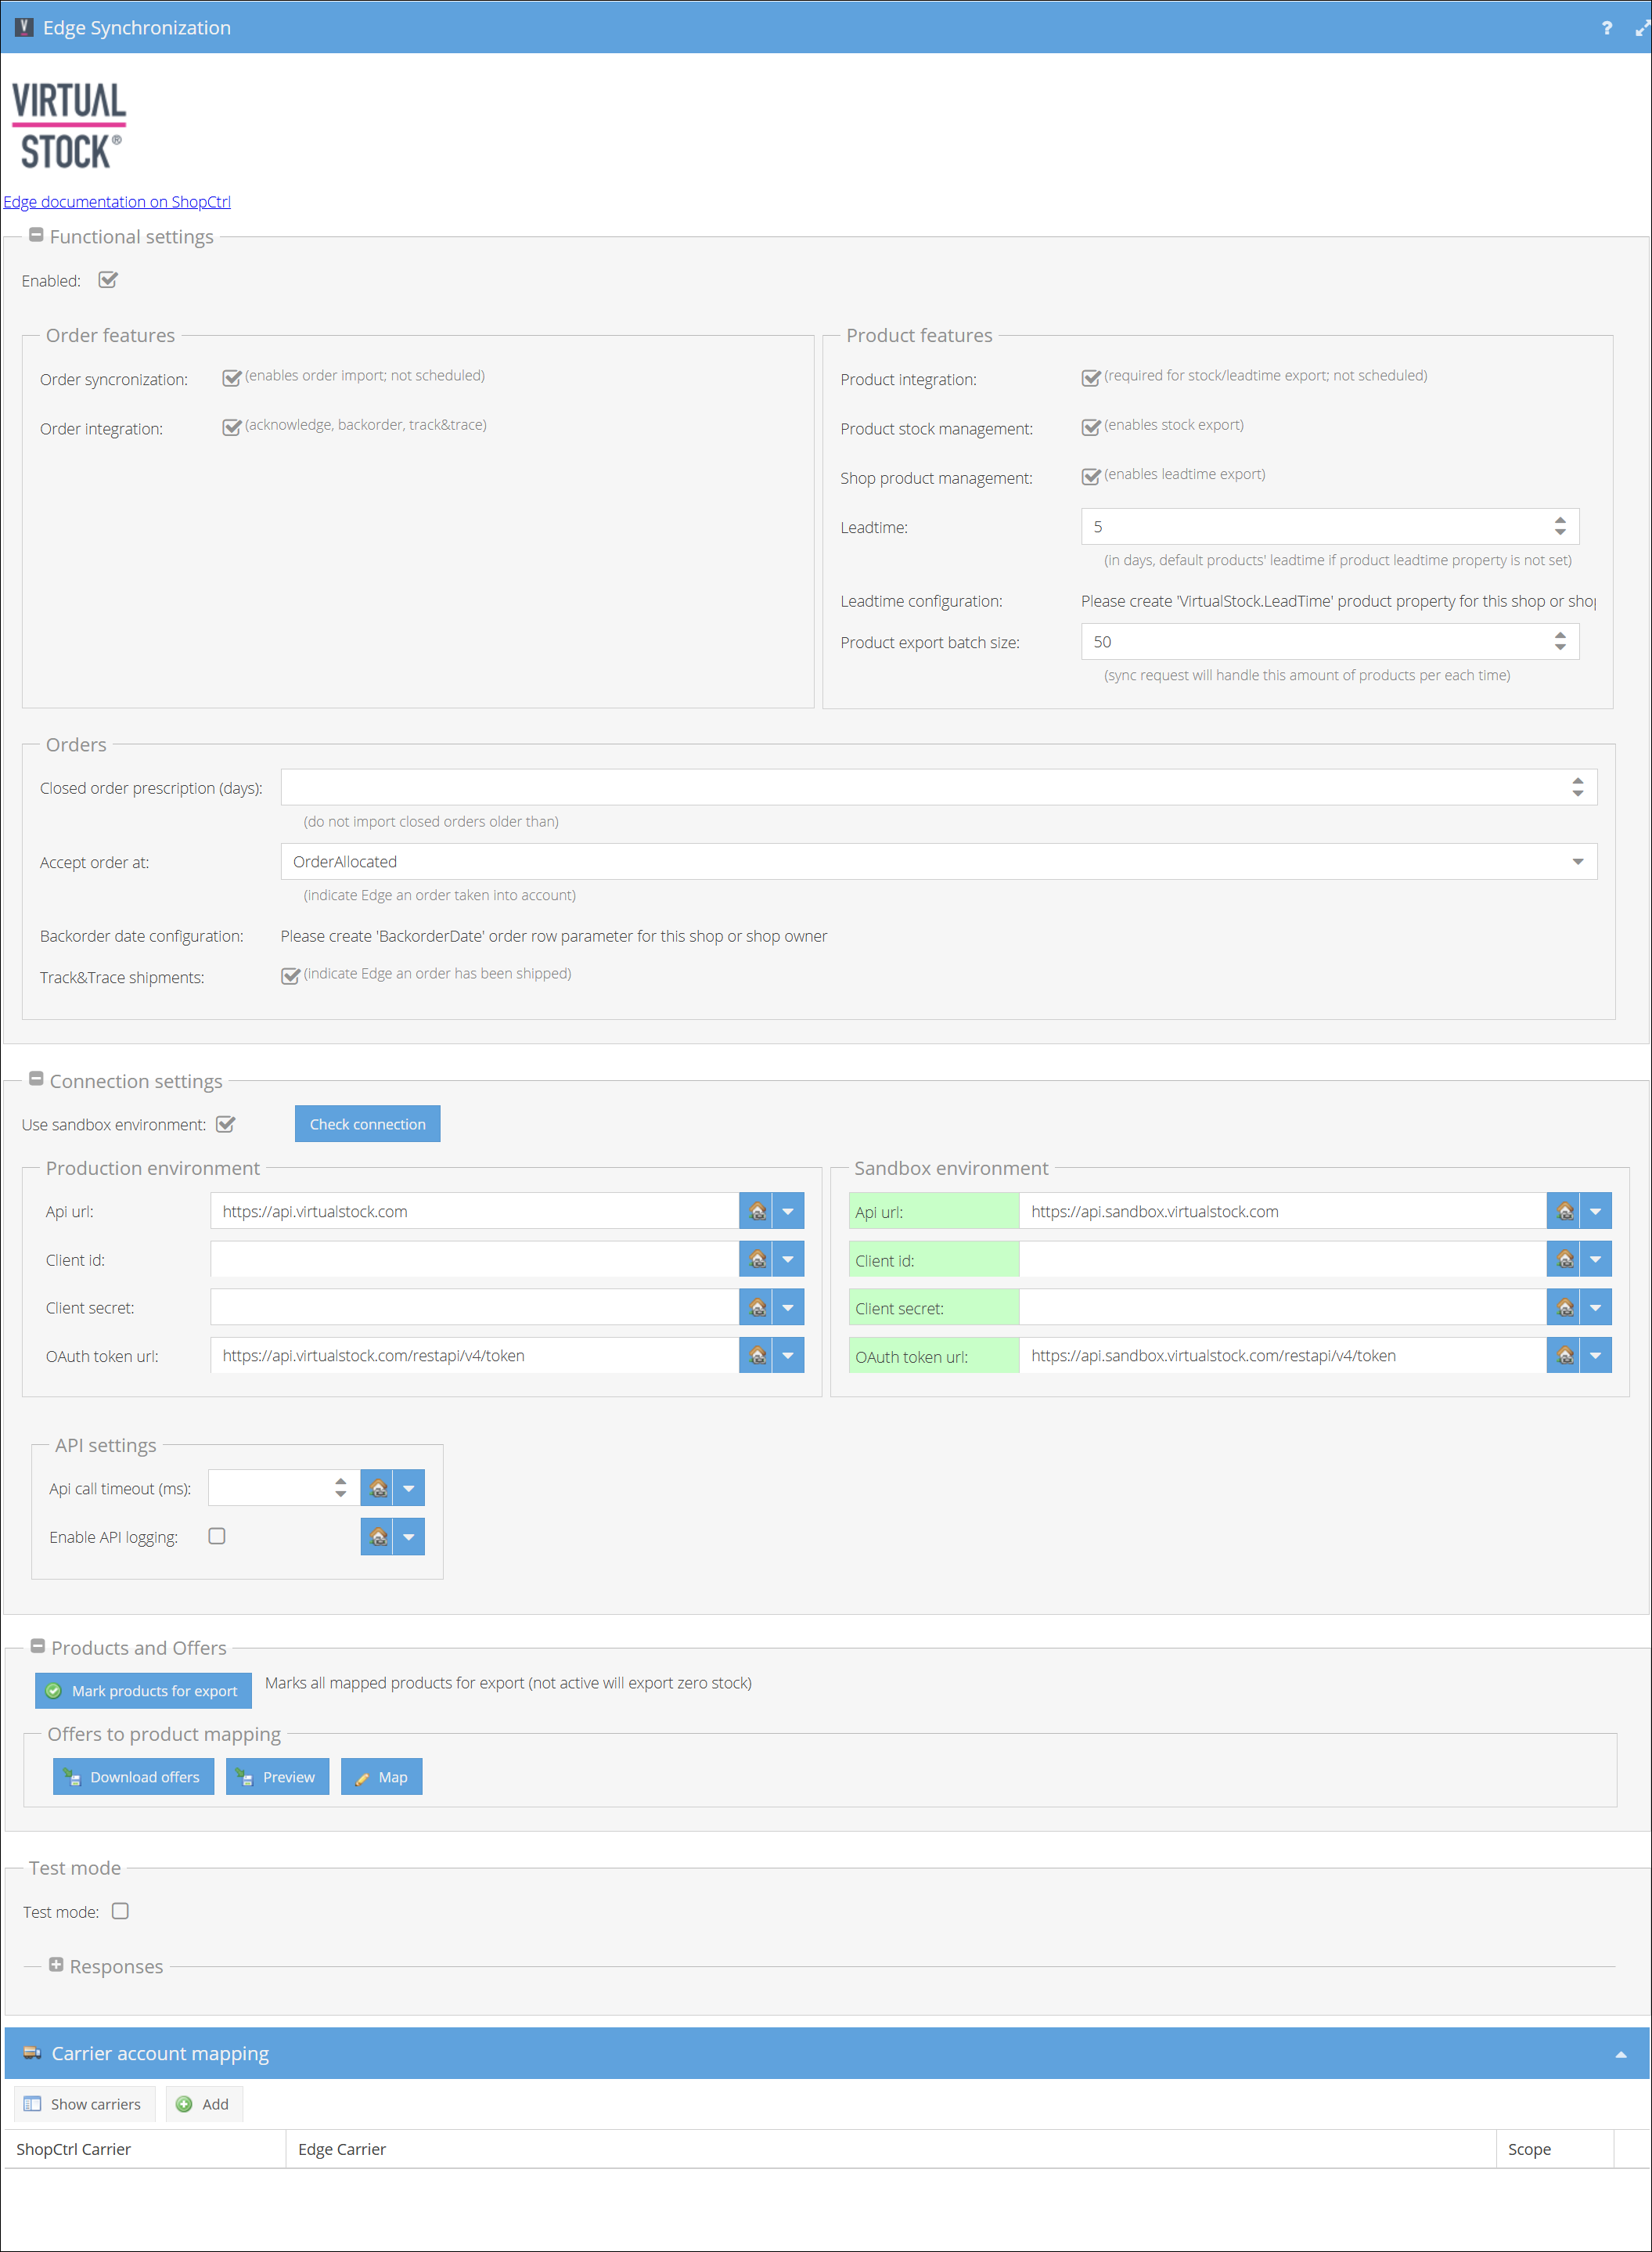
- From the topic menu, go to Shop Synchronization > Edge Synchronization.
- Scroll down the setings to the Connection Settings section. Make sure the 'Use sandbox environment' checkbox is not activated.
- In the Connection Settings:
- Enter your:
- Client ID
- Client Secret
- Verify default URLs:
- API URL:
https://api.virtualstock.com - OAuth Token URL:
https://api.virtualstock.com/restapi/v4/token
- API URL:
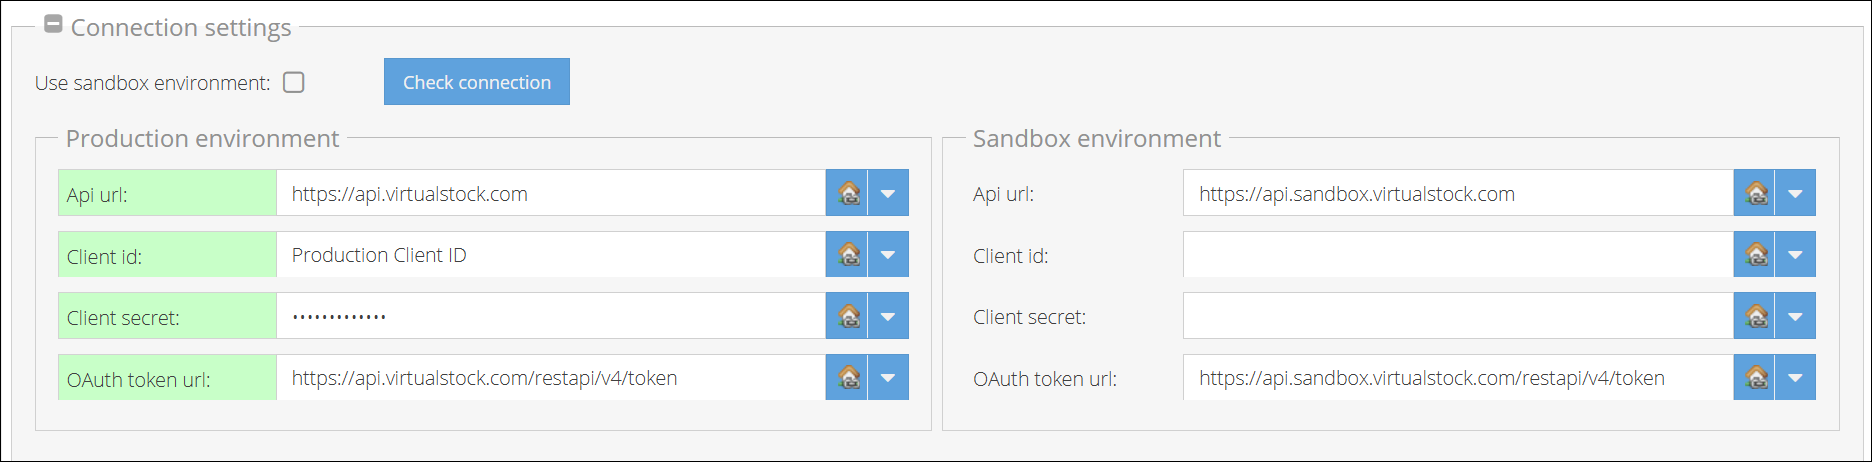
- Enter your:
- Click Save or Save and Close to apply changes to the shop.
- Click Connect to validate credentials.
Step 2: Configure Order Import and Export
1. Enabling Order Synchronization
To begin importing orders from Virtual Stock (Edge):
- Log in to ShopCtrl with Shop Owner Admin privileges.
- Navigate to Configuration > Shops.
- Select your Virtual Stock shop and click Edit.
- Go to Shop Synchronization > Edge Synchronization.
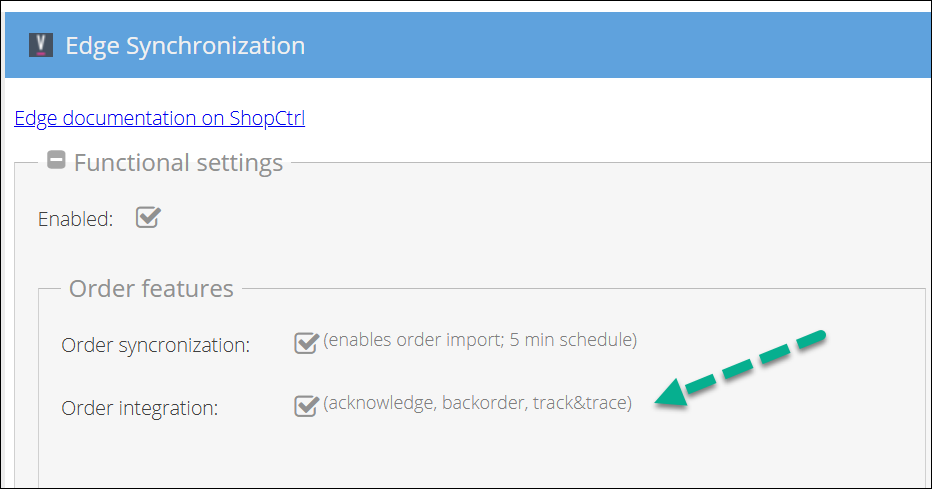
- In the Functional Settings section:
- Enable the Order synchronization checkbox.
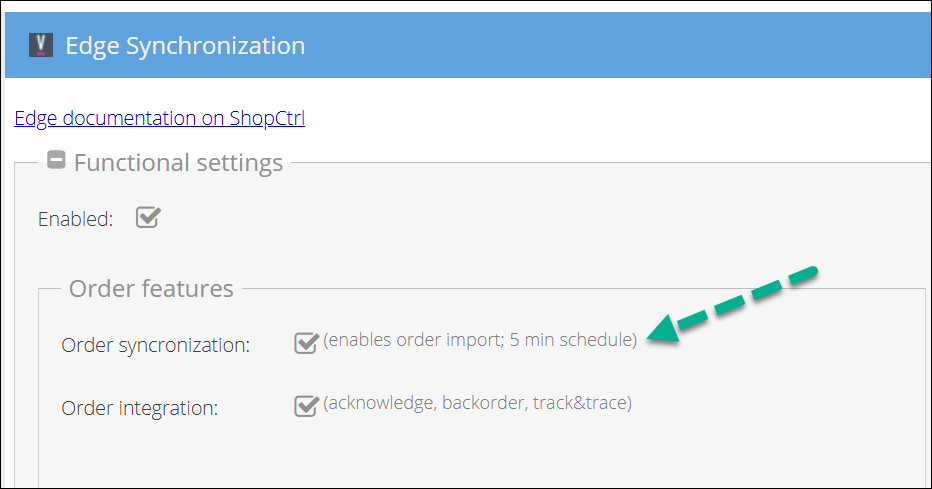
- Toggle Enabled to activate the app module.
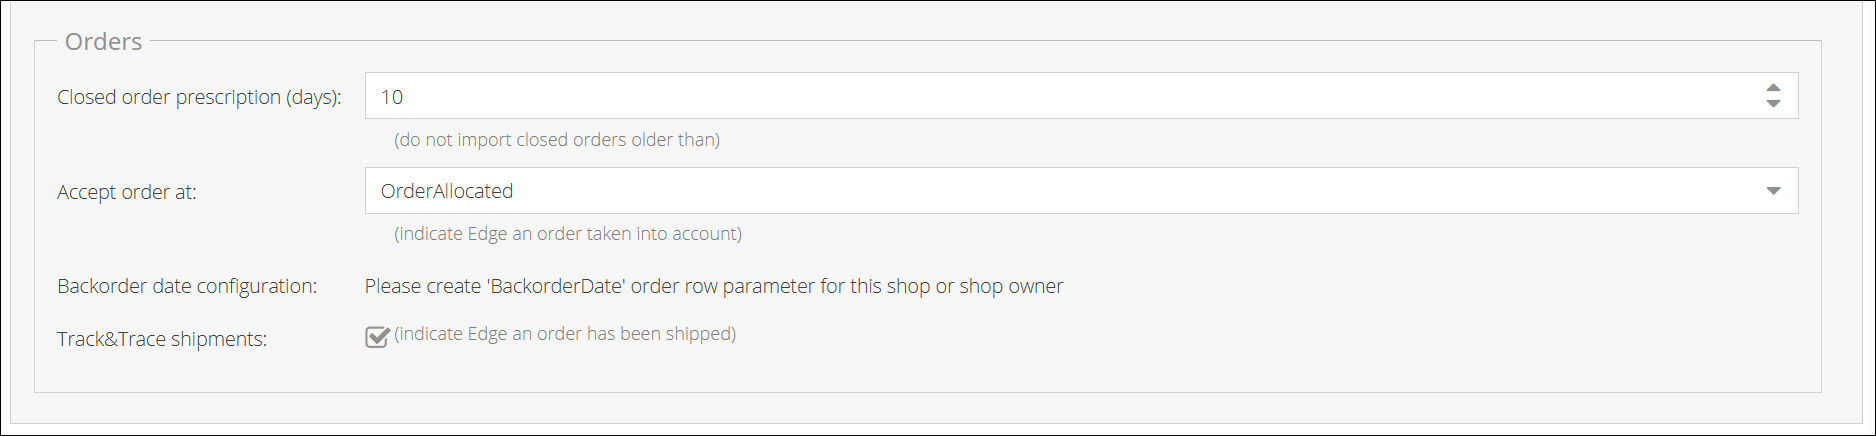
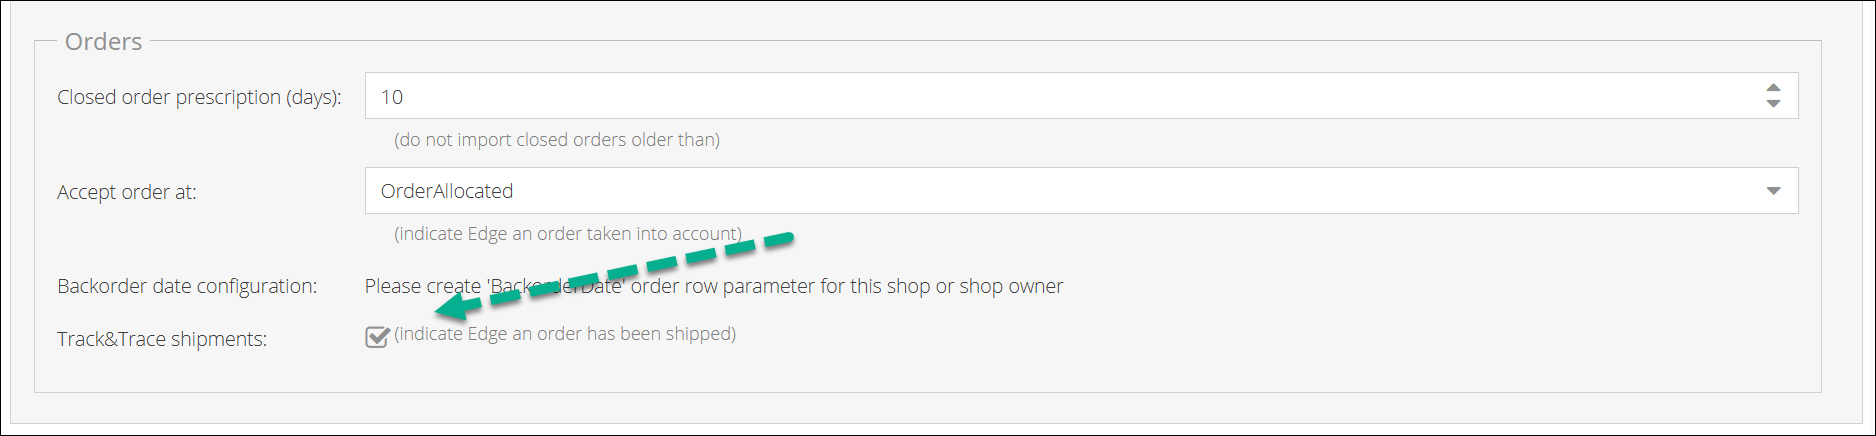
- Lower in the Orders section, configure order import preferences:
- To exclude historical closed orders: Set "Import closed orders older than" to 0 days.
- [X] days to import recent closed orders (recommended for initial setup).
- Click Save or Save and Close.
2. Order Processing Workflow
The Order integration checkbox enables three key features:
- Order acknowledgement
- Backorder management
- Track & trace updates
How it works:
When orders synchronize, ShopCtrl automatically allocates stock.
- For fully allocated orders:
- Acknowledgement is immediately sent to Virtual Stock.
- For partial allocations:
- System waits for full allocation
- OR provide a
BackorderDatefor unavailable items:- Set via UI or API per order row
- ShopCtrl communicates the latest backorder date to Virtual Stock
Create an Order Row Parameter named exactly BackorderDate (date type) for backorder functionality.
3. Exporting Tracking Information
Sending of the tracking information is done automatically and it is triggered by setting shipment as shipped.
To set up automatic tracking exports:
- In the Carrier Mapping section:
- Click Show carriers to view Virtual Stock's codes
- Map each ShopCtrl carrier to its corresponding Edge Carrier code (Use only the codes, ignore IDs/names)
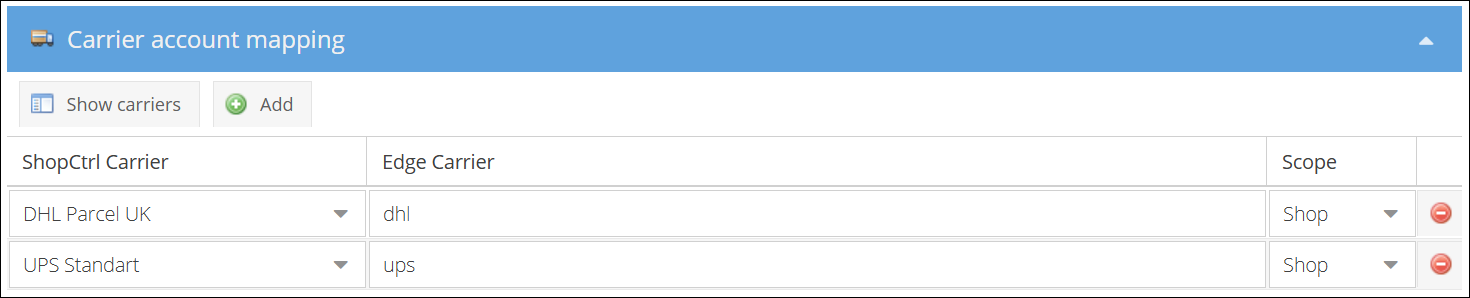
- Enable Track & Trace shipments in the Orders section
- Click Save or Save and Close.
4. Activating Full Integration
Enable all features simultaneously by:
- Going to Functional Settings
- Checking the Order integration master switch
(This enables acknowledgements, backorders, and tracking)
Step 3. Configure product stock export
Before starting synchronization, ensure the following:
- Products exist in ShopCtrl.
- Corresponding offers are published on Virtual Stock (Edge).
Linking Products and Offers
To synchronize inventory, ShopCtrl products must be mapped to Virtual Stock (Edge) offers by matching:
ShopCtrl Product Code → Virtual Stock Supplier Part Number (SKU)
Mapping Process:
- Log in to your ShopCtrl account as a user with the Shop Admin role.
- In the sales channels pane on the right, select the shop for which the Virtual Stock (Edge) synchronization has been configured and click Settings.
- Within the topic menu, select Shop synchronization > Edge Synchronization.
- Go to the Products and Offers pane.

- Click Download offers to get current Virtual Stock offers.
- Click Preview to generate an estimation file showing the details of the mapping process.
- Review and Correct Errors:
- Open the downloaded file and address any discrepancies. The file includes the following sheets:
- Offers: Lists all Virtual Stock (Edge) offers.
- Errors (if any): Identifies critical issues.
- Warnings (if any): Highlights issues, such as products not found in ShopCtrl, which may require attention.
- Remain: Displays existing product-offer mappings.
- Update: Shows updates to be applied to current mappings.
- Create: Lists new mappings to be created.
- Delete: Indicates mappings to be removed because the corresponding product no longer exists.
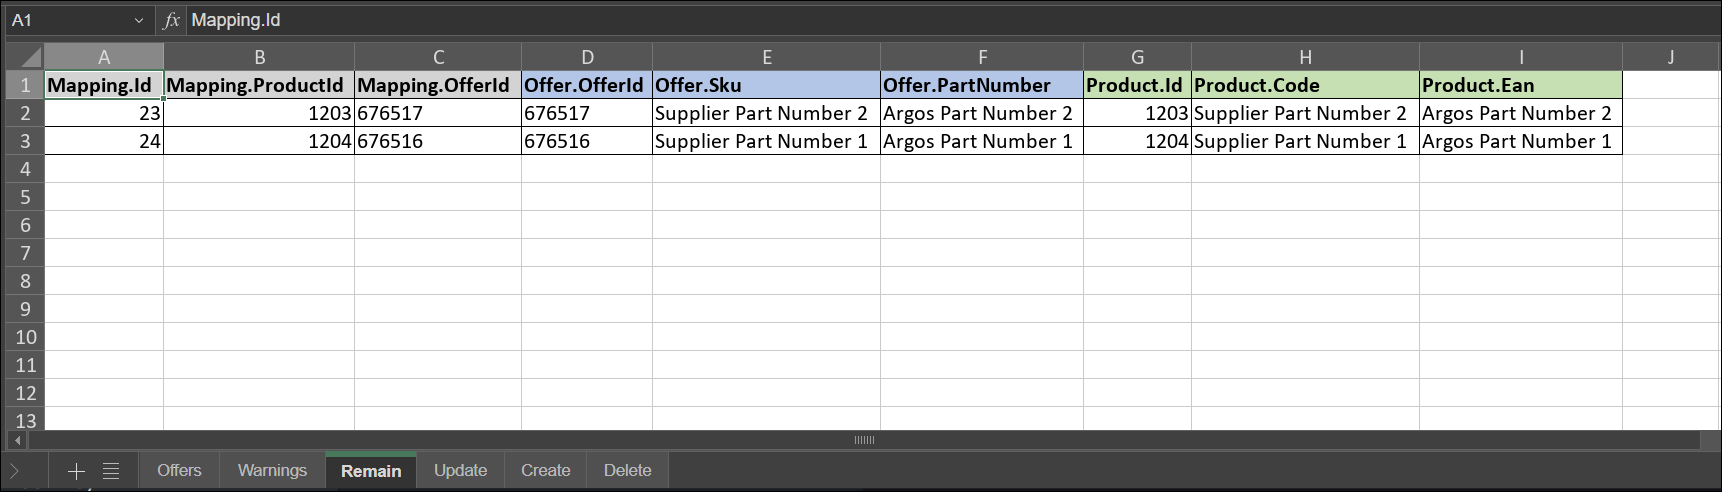
- Open the downloaded file and address any discrepancies. The file includes the following sheets:
- Once errors are resolved, repeat steps to download the latest products list and click the Map button to confirm the matches and generate the mappings.
- Click Save or Save and Close.
Configuring Product Lead Times
Virtual Stock requires lead time data for each product:
- Create a product property named
VirtualStock.LeadTime(Number type). - Populate values for all products.
- Set a default fallback value (in days) for products without specified lead times.
In order to support this scenario ShopCtrl exports the value of the custom product property VirtualStock.LeadTime for each of the product published at the shop.
Learn more about Product Properties.
Enabling Stock Synchronization
To activate product data export:
- Log in to ShopCtrl with Shop Owner Admin privileges.
- Navigate to Configuration > Shops.
- Select your Virtual Stock shop and click Edit.
- On the Edge Synchronization tab > Functional settings > Product features pane:
- Enable Product integration.
- Enable Product stock management.
- Enable Shop product management.
- Configure the Lead time fallback value.
- Verify that the Leadtime property is correctly configured for the system.
- Set Product Export batch size (recommended: 50 products/request).

- Click Save or Save and Close to apply changes to the shop.
- The final step is to Mark products for export. All mapped products will have their current stock levels exported. This establishes the baseline inventory data in Virtual Stock's system
After finishing the configuration, we need to export the product stock first time. Mark products for export This is done as a separate manual step. ShopCtrl watches the changes on product stock and sends updates to sales channels the moment stock is changed. But after initial setup, stock of most of products was not changed yet. So ShopCtrl needs a manual signal that will export stock of all of the products published at the designated shop.
You've now completed the Virtual Stock (Edge) integration setup, enabling:
- Order processing (import, acknowledgement, tracking)
- Product synchronization (mapping, lead times)
- Inventory management (stock level updates)
The integration will automatically maintain data consistency between ShopCtrl and Virtual Stock, streamlining your supply chain operations. For ongoing management, monitor the synchronization status and update product mappings as needed.
Updating product mappings
Product-offer mapping is an ongoing process. Whenever new products are added to both ShopCtrl and Virtual Stock (Edge), you must repeat the mapping process to establish the connection for these new items.
After creating new mappings, you must also manually trigger a stock export to ensure the new products inventory levels are updated in Virtual Stock's system.
Steps to Map New Products:
- Prerequisite: Ensure a product with an identical Product Code in ShopCtrl and Supplier Part Number (SKU) in Virtual Stock exists on both platforms.
- Log in to ShopCtrl with Shop Owner Admin permissions.
- Navigate to Configuration > Shops.
- Select your Virtual Stock shop and click Edit.
- Go to the Shop synchronization > Edge Synchronization tab and open the Products and Offers pane.
- Click Download offers to fetch the latest list of offers from Virtual Stock.
- Click Preview to generate a mapping estimation file. Review the Create and Update tabs to identify new and modified mappings.
- Once confirmed, click Map to finalize the mapping process in ShopCtrl.
- Trigger Stock Export: Manually click Mark products for export. This creates sync requests to update all mapped products in Virtual Stock.
The export process may take up to 20 minutes to complete, as products are sent to the API in batches of 50 to comply with rate limits.
- Verification: Confirm the successful stock export by checking the product information directly in your Virtual Stock account or by downloading a new Preview file in ShopCtrl to review the updated status.