Ticket Details
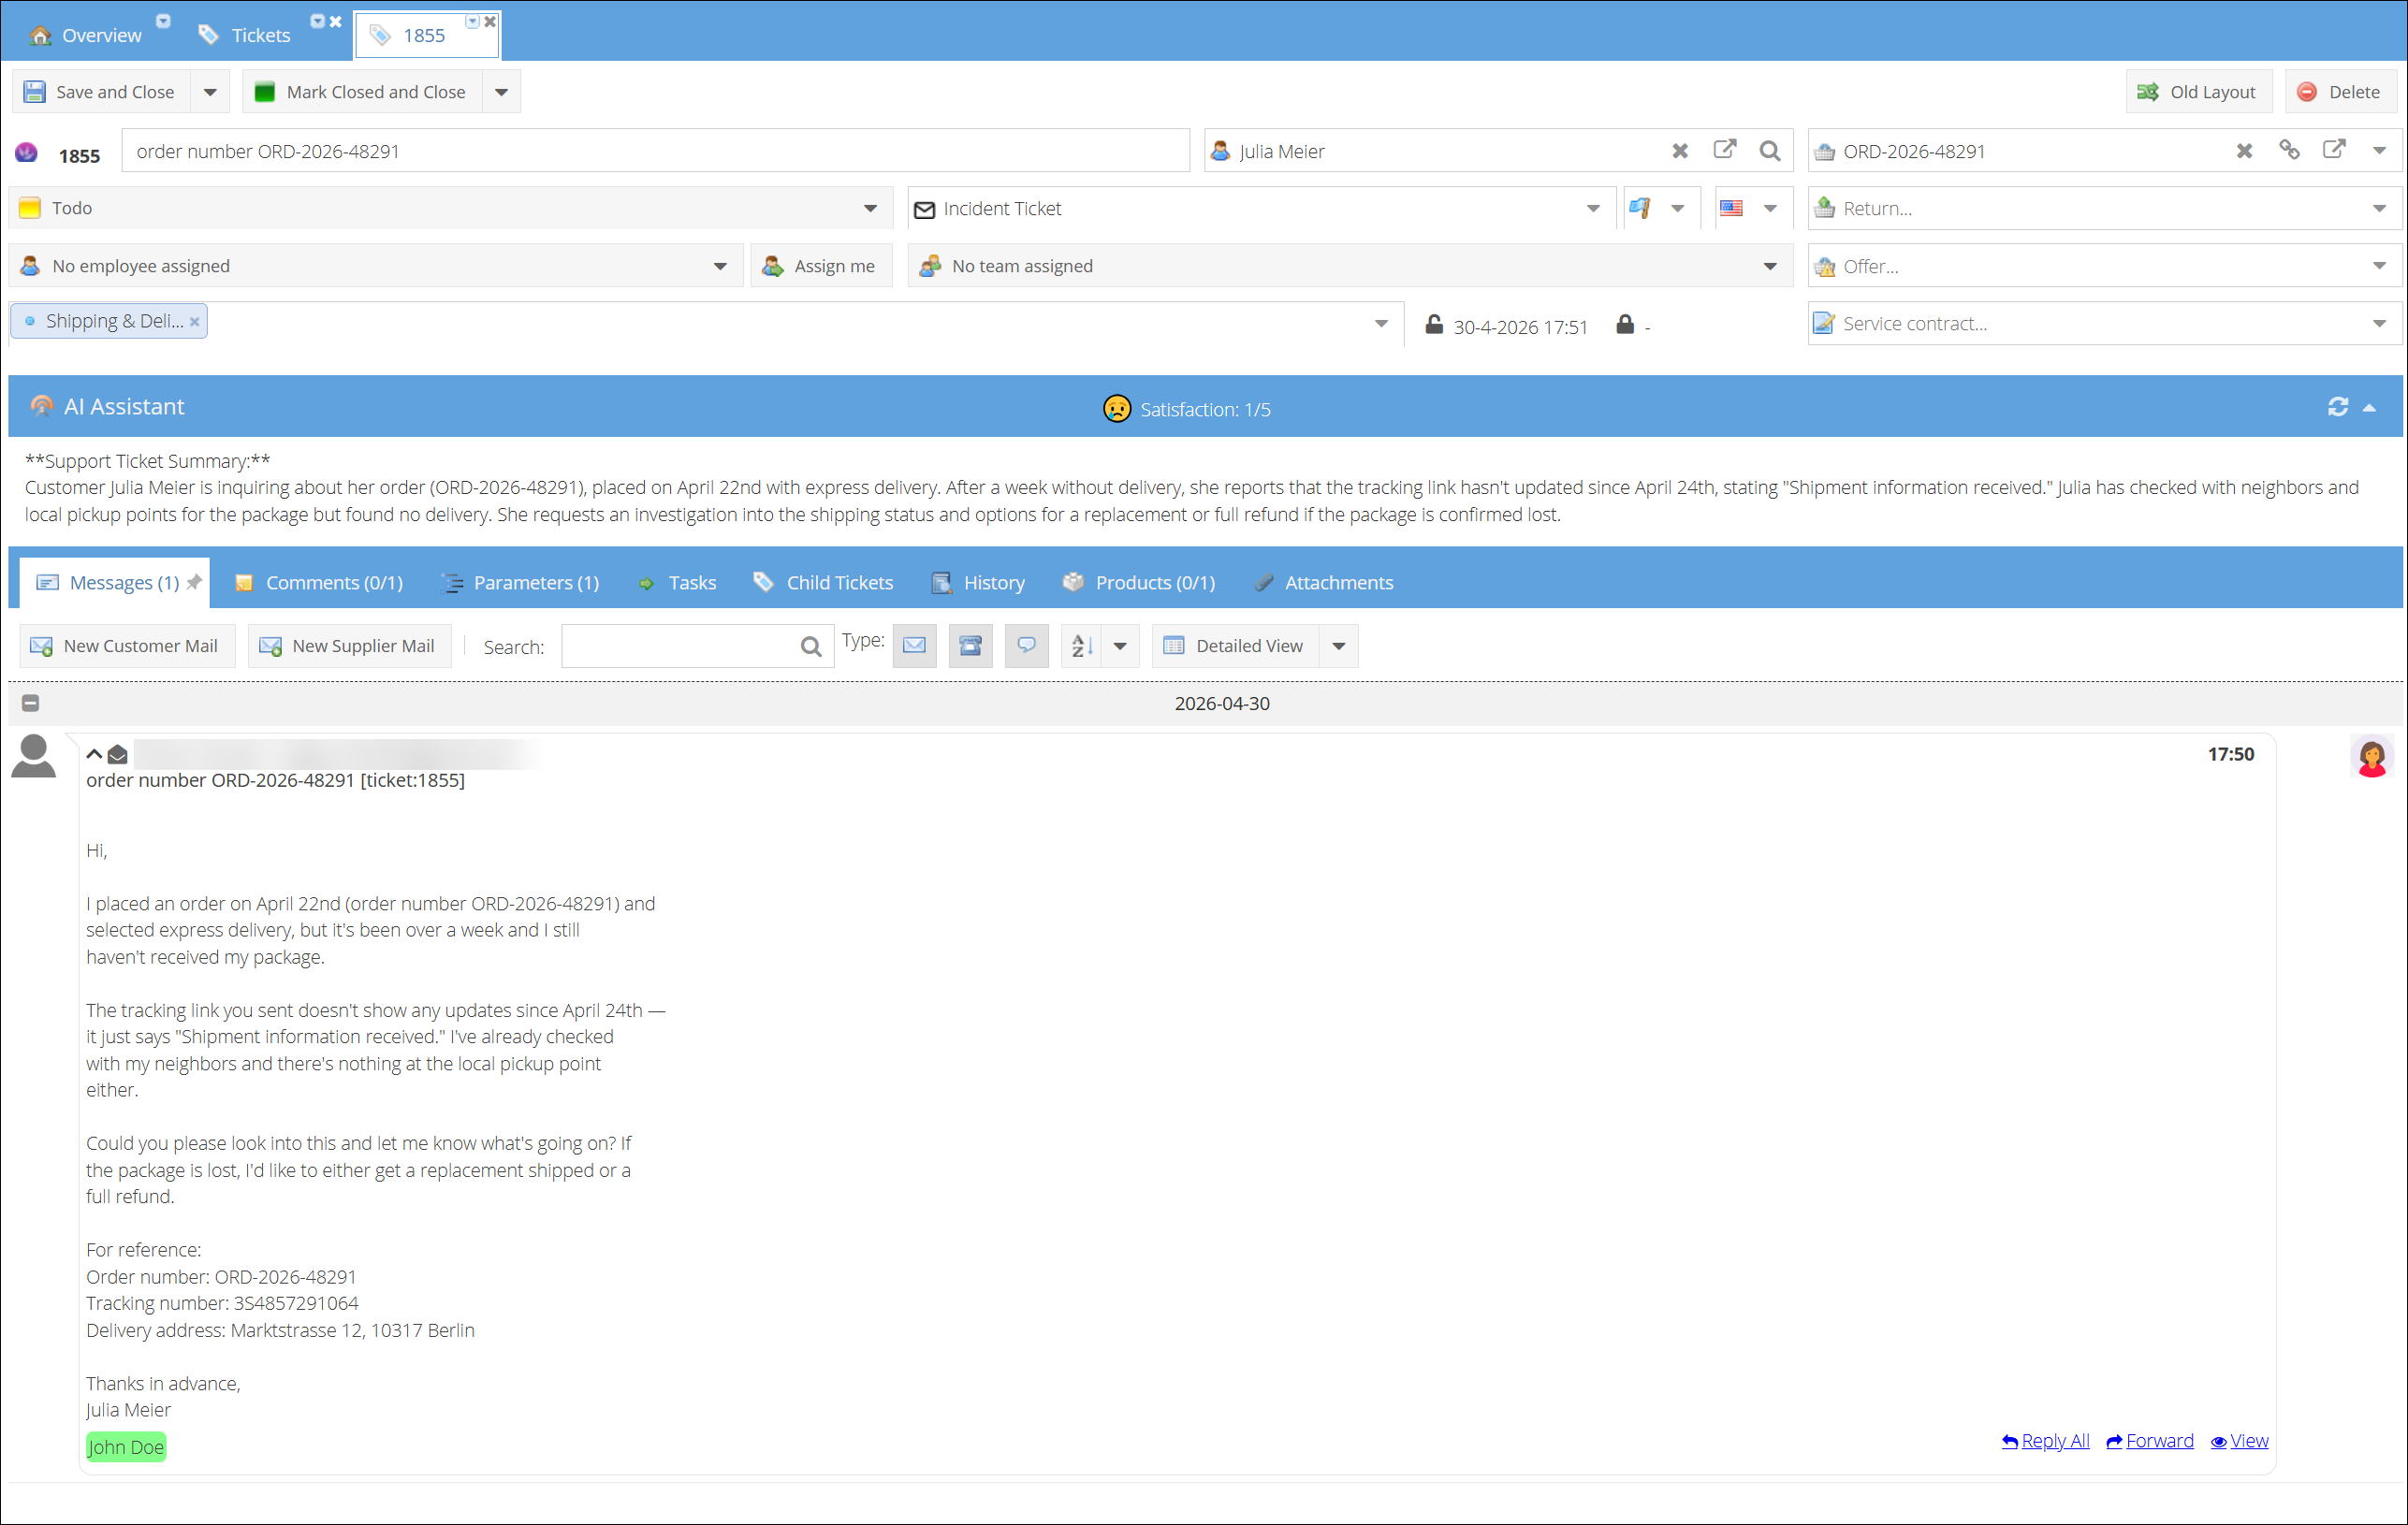
The ticket detail window displays all information about a ticket and allows you to manage communication, assign employees, track products, and more. To open it, double-click a ticket or click the edit button in the main ticket screen.
Action Buttons
The top section contains the main action buttons:
- Save and Close — Save the ticket and close the detail window. Use the dropdown arrow to access Save (without closing).
- Mark Closed and Close — Set the ticket status to Closed and close the window.
- Delete — Remove the ticket.
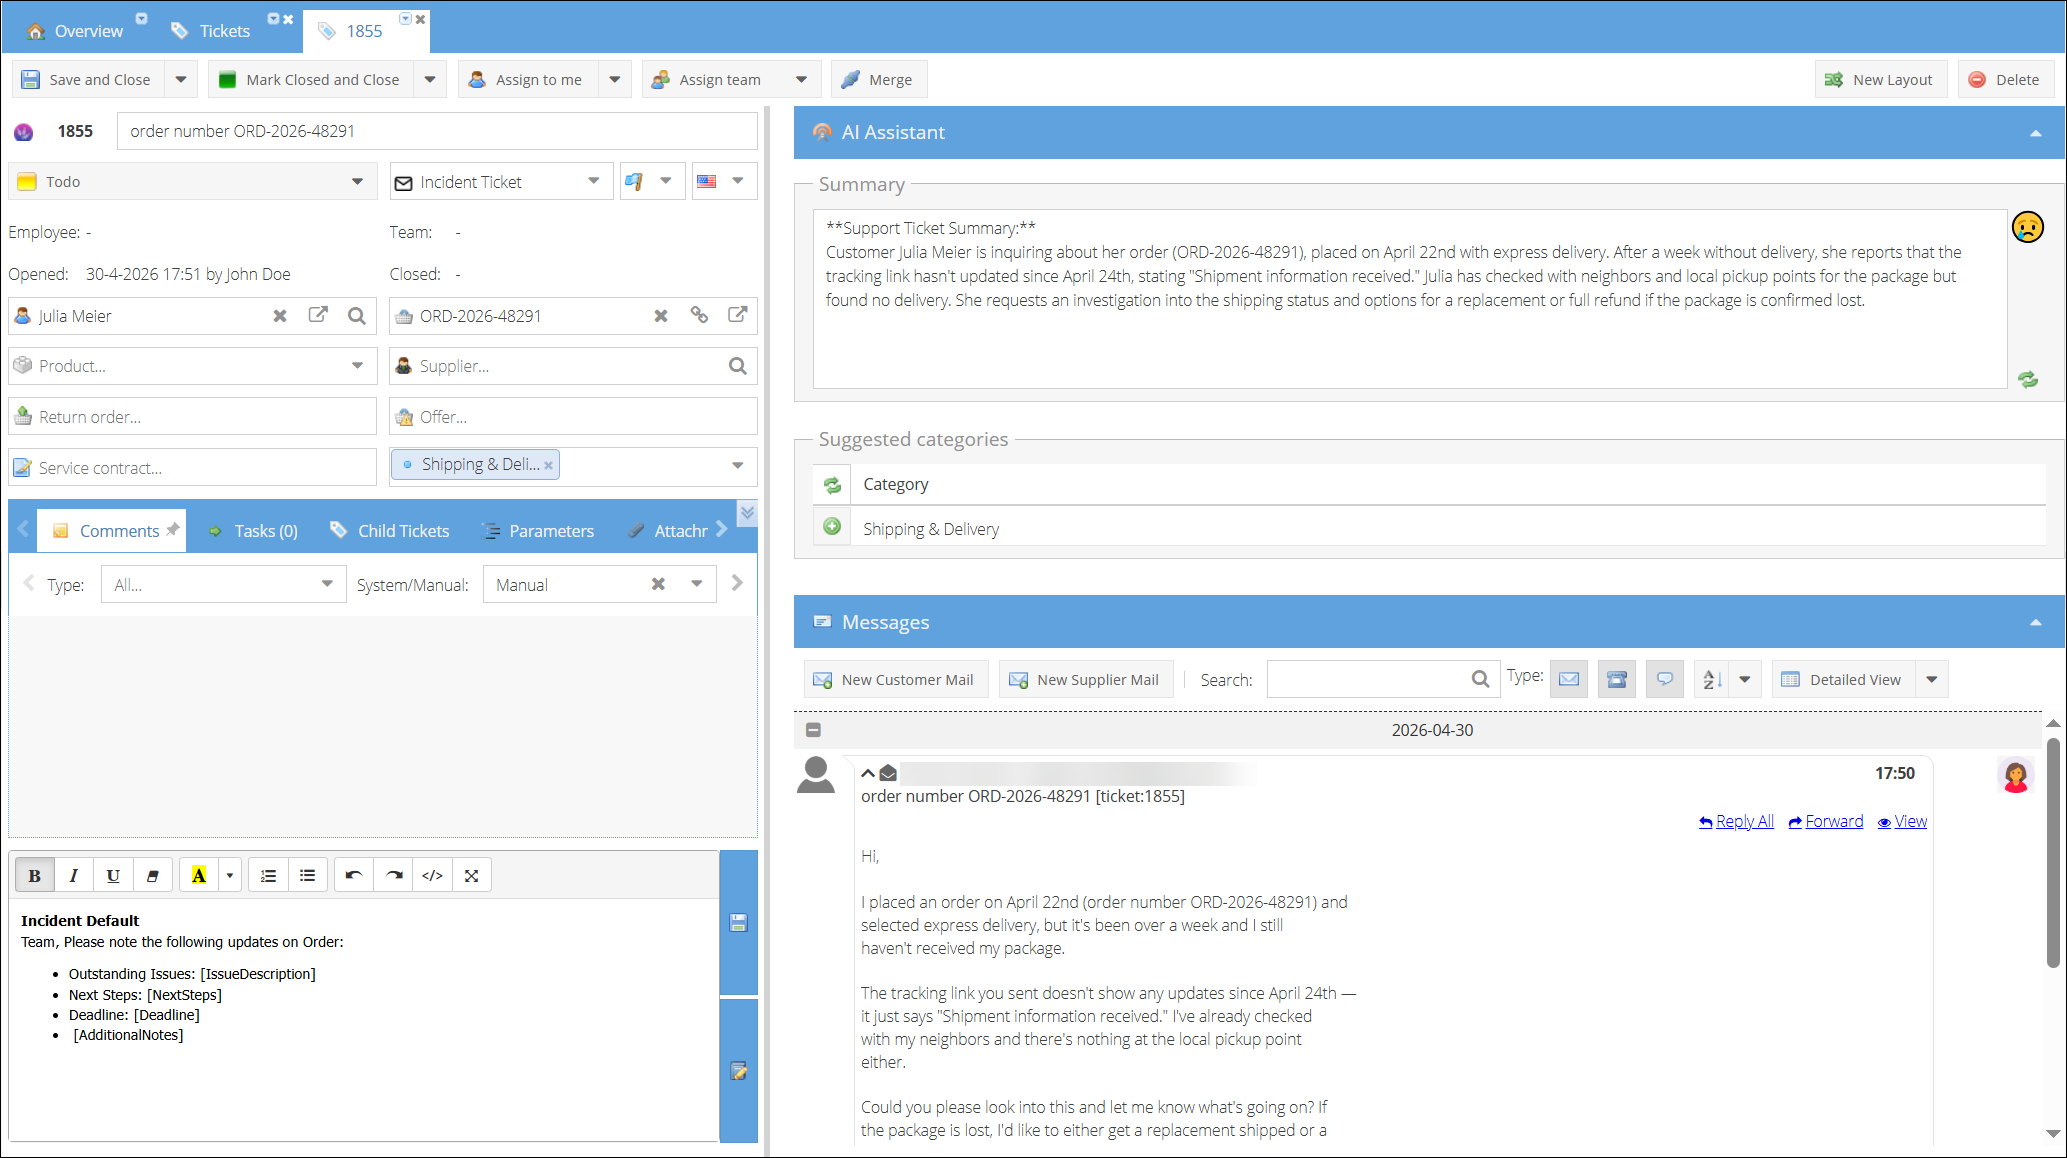
- Old Layout — Switch to the previous ticket detail layout. This saves your preference per employee — all tickets will open in the old layout until you switch back. The old layout has a New Layout button to return to the current view.
Old style ticket details layout
Ticket Header

The header area displays key ticket information in a compact layout:
| Field | Description |
|---|---|
| Ticket ID | Unique ticket number (e.g. 1852). |
| Title | Subject line of the ticket. Editable directly in the header. |
| Company | The customer company linked to this ticket. Click the icons to open, edit, or search for a different company. |
| Order | The linked order number (if applicable). |
| Status folder | Current status folder (e.g. Todo, Closed). |
| Ticket type | The type of ticket (e.g. Incident Ticket). Select from the dropdown. |
| Priority | Ticket priority flag. |
| Language | Language of the ticket, shown as a country flag. |
| Return / Offer / Service contract | Quick-link dropdowns to associate the ticket with a return, offer, or service contract. |
Assignment
- Employee assignment — Click the employee dropdown (shows No employee assigned or the assigned employee name) to assign the ticket to a specific employee. The Assign me button provides a shortcut to assign the ticket to yourself. This button is hidden when you are already the assignee.
- Group assignment — Select a support team or group from the group dropdown (shows No team assigned or the assigned team name).
Categories
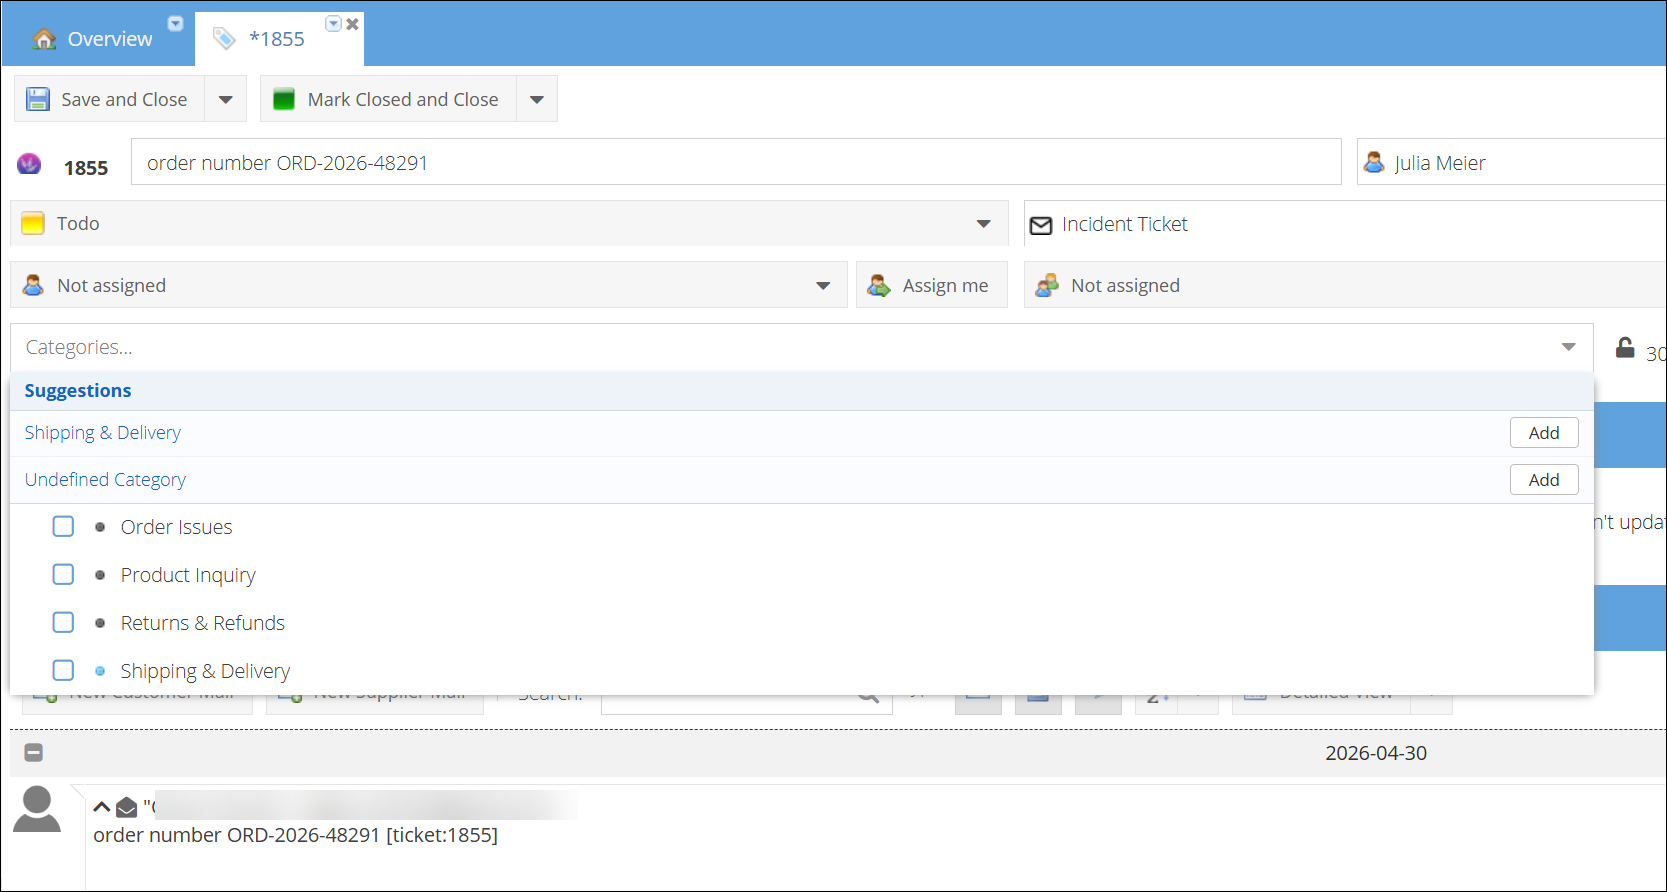
The category dropdown allows you to assign one or more categories to the ticket. When the AI Assistant is enabled, it automatically suggests categories based on the ticket content — these suggestions appear directly in the category dropdown. You can apply the suggested categories or choose your own from the full category list.
Dates
- Opened date — Shows the date and time the ticket was created (lock icon).
- Closed date — Shows the date and time the ticket was closed, or
-if still open.
Once you have selected at least one category, the AI will no longer auto-load new suggestions. Use the refresh button in the AI Assistant panel to request updated suggestions at any time.
AI Assistant
The AI Assistant panel sits directly below the ticket header. It automatically analyzes the ticket content (messages, title, comments) and provides:
- Satisfaction score — A satisfaction rating (e.g. 2/5) displayed with an emoji indicator in the panel header.
- AI Summary — A brief summary of the customer's issue, generated from the ticket content.
Use the refresh button in the panel header to regenerate the AI analysis. The panel is collapsible — click the collapse/expand arrows to toggle its visibility.
The AI Assistant requires configuration. See Ticket AI Assistant for setup instructions including API key configuration and category training.
Tabs
All ticket-related information is organized into tabs below the AI Assistant panel. Each tab title shows a count badge indicating the number of items (e.g. Messages (2), Comments (1), Parameters (1)). Tabs load their content on first click for faster page performance.
Reordering tabs
You can drag and drop tabs to rearrange them in any order you prefer. The tab order is saved per employee, so each team member can organize their workspace independently.
Pinning a tab
You can pin one tab to keep it always visible while working in other tabs. To pin a tab, hover over the active tab and click the pin icon that appears on the right side of the tab header. This splits the view into two columns: the pinned tab on the left and the remaining tabs on the right.
- Only the active tab shows the pin icon.
- Only one tab can be pinned at a time. Pinning a different tab replaces the current pin.
- Drag the splitter between the columns to adjust the width.
- The pinned tab and column width are saved per employee and restored automatically on next visit.
- To unpin, click the pin icon in the pinned panel header.
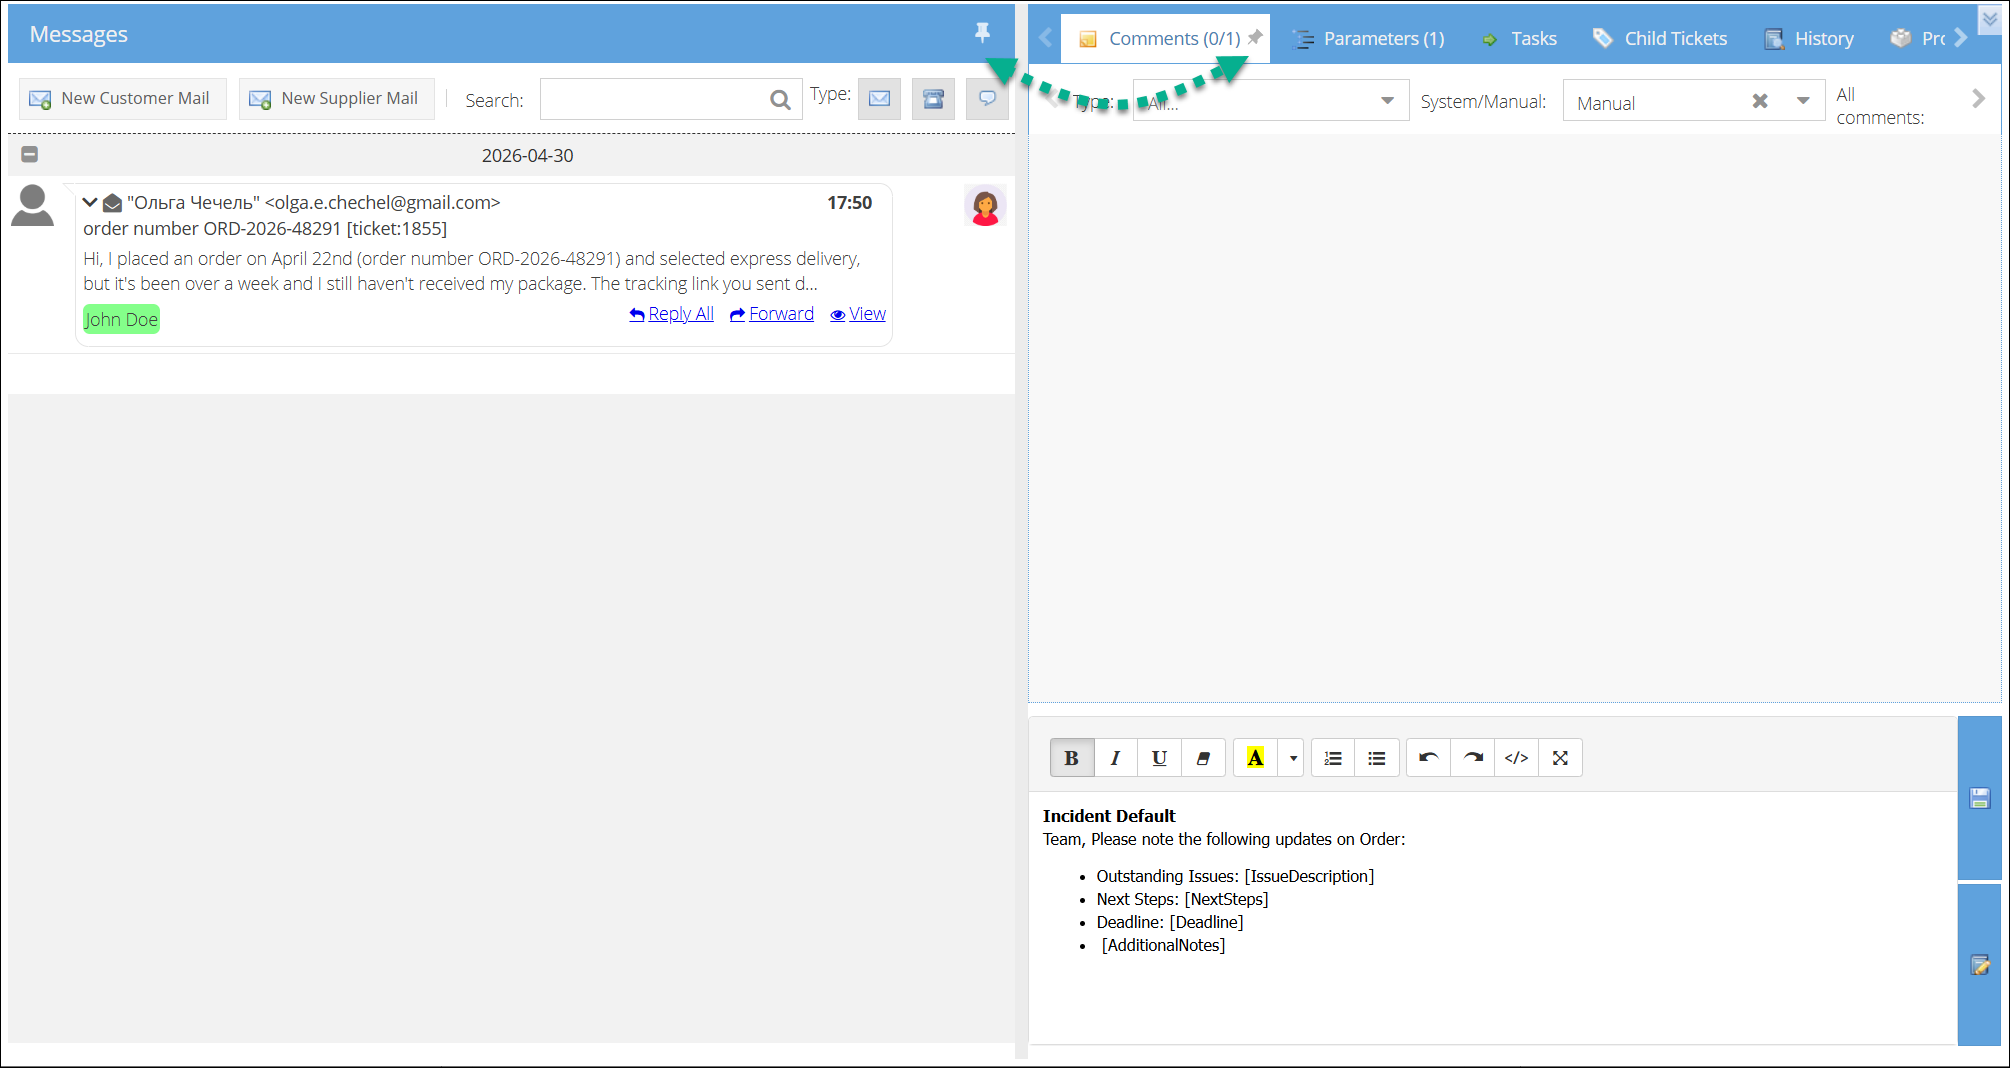
Messages
The Messages tab is the default view and shows all communication related to the ticket.
Message timeline:

Messages are grouped by date and displayed in a timeline format. Each message shows:
- Sender name and email address
- Timestamp
- Message preview (click to expand the full content)
- Action links: Reply All, Forward, View
Message colors indicate the type:
- Light gray — Incoming customer message
- Light green — Reply from a customer support agent
- Blue — Non-customer communication (e.g. supplier, internal)
The most recent non-auto-reply message is automatically expanded when you open the ticket.
Composing messages:
Use the toolbar buttons to start a new message:
- New Customer Mail — Compose a reply to the customer.
- New Supplier Mail — Compose a message to a supplier or third party.
The compose window supports minimize, restore, and close. When minimized, it collapses to the bottom-left corner of the screen so you can continue reviewing the ticket while drafting a reply. Closing the compose window with unsaved changes will prompt you to confirm.
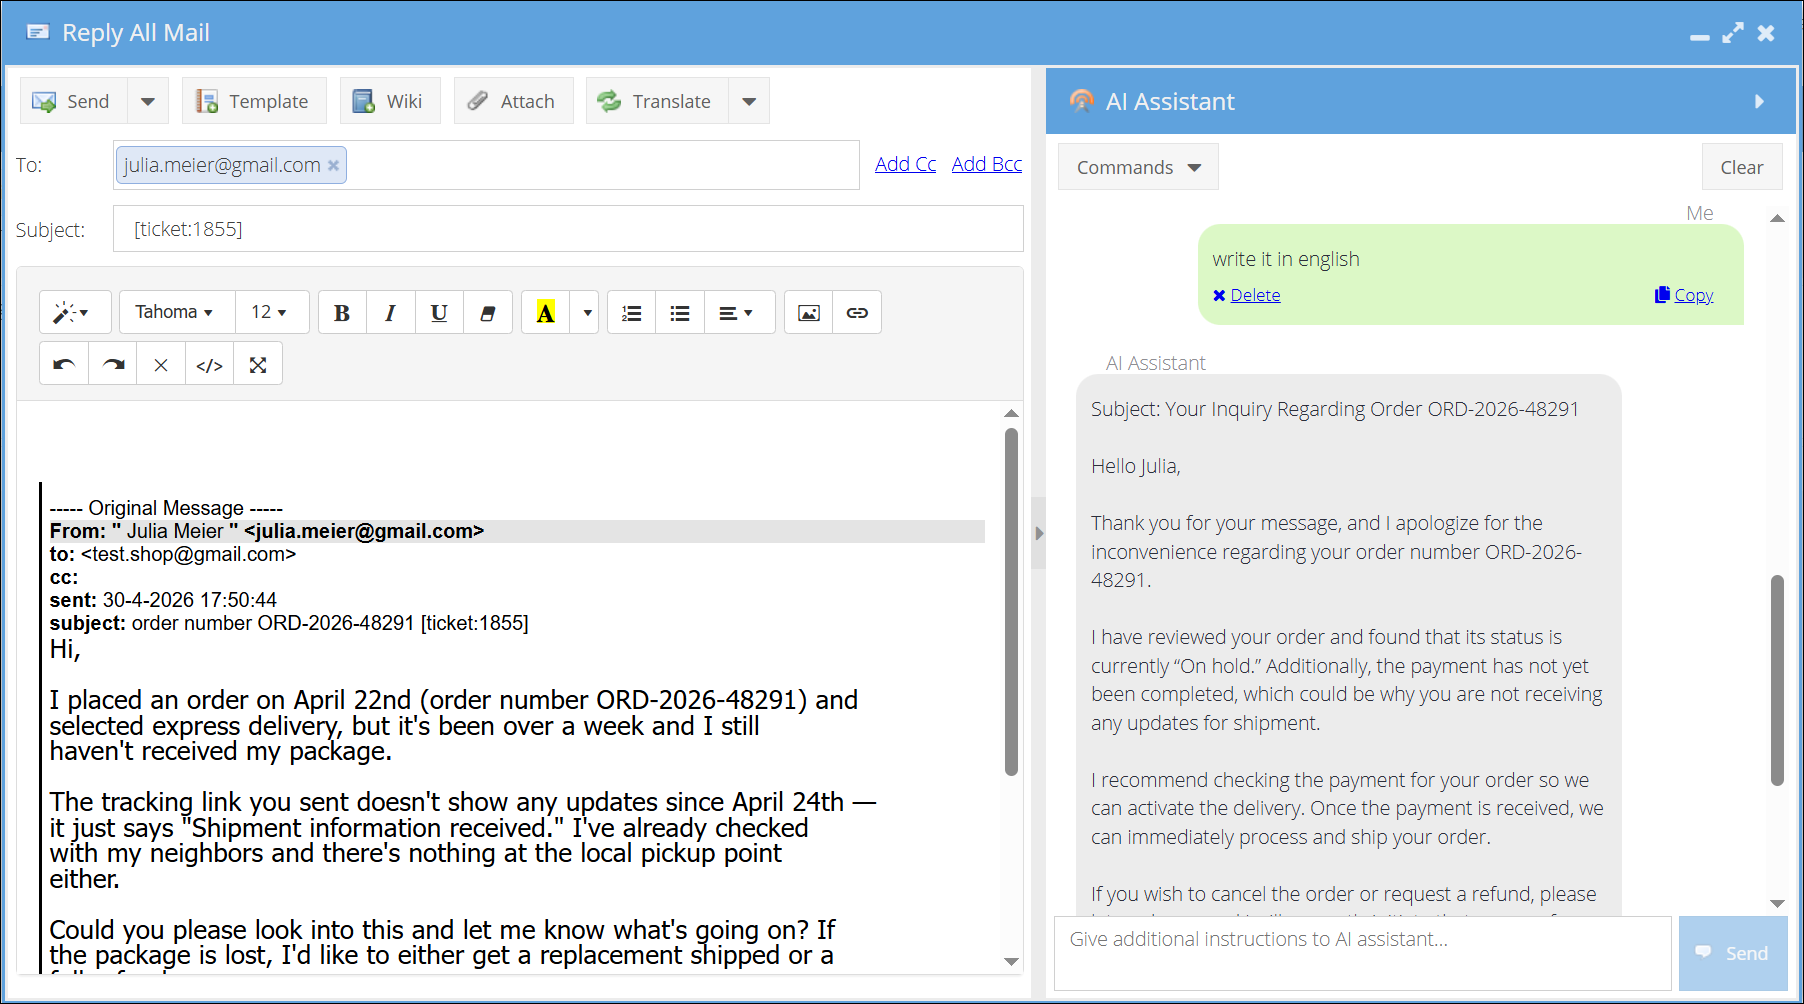
The AI Assistant is also available inside the compose window. Use it to get help drafting your reply — for example, to generate a response based on the ticket context or to adjust the tone of your message.
Toolbar options:
- Search — Filter messages by keyword.
- Type filter — Filter by message type (mail, note, phone, chat).
- Sort — Change the message sort order.
- Detailed View — Toggle between compact and detailed message display.
Comments
Internal comments that are not visible to customers. Use comments for internal notes, handover information, or team coordination.
Attachments
View, upload, and manage file attachments related to the ticket.
Products
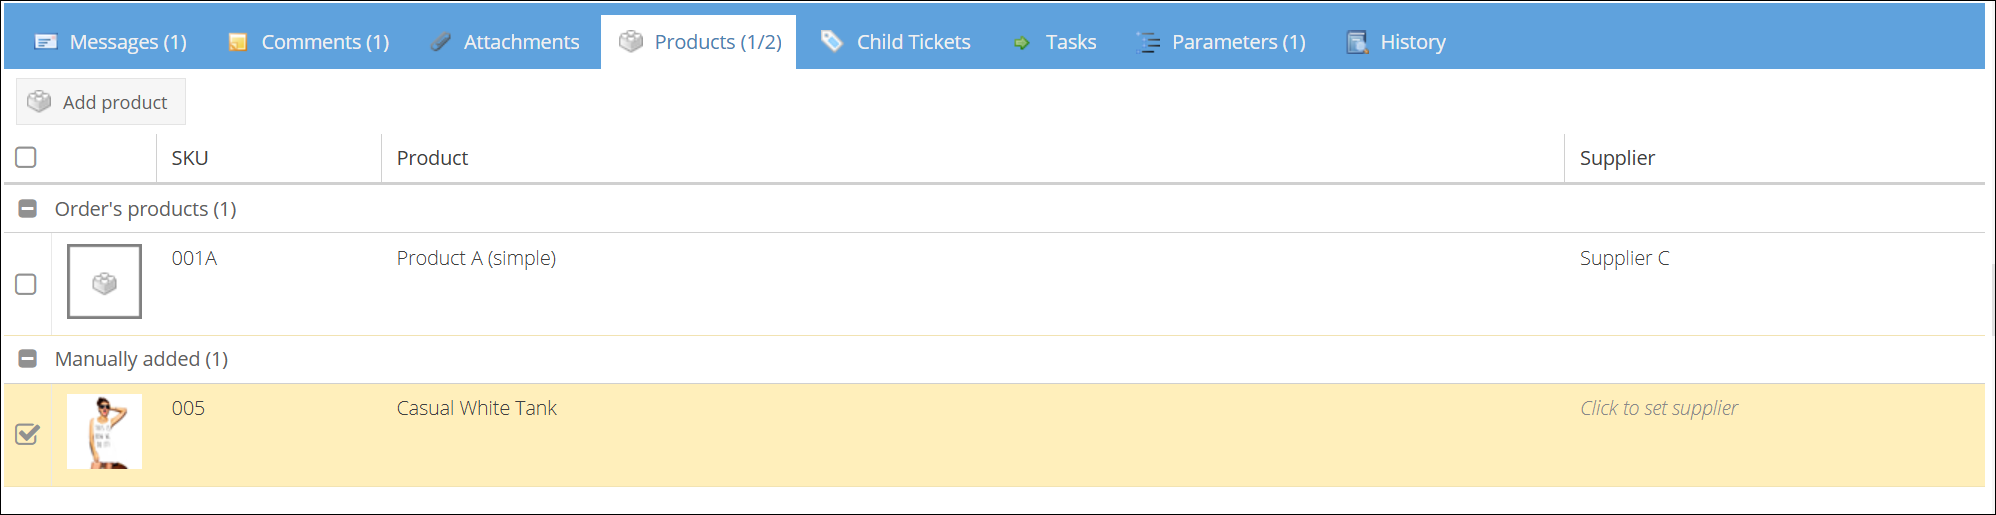
The Products tab shows which products are associated with the ticket. The tab badge displays the count as selected/total (e.g. Products (0/3)).
Products can come from two sources:
- Order products — Automatically loaded from the linked order (if any).
- Manually added products — Added via the search/add function within the tab.
The product grid displays:
- Product image thumbnail
- SKU
- Product name
- Supplier (editable inline)
Use the checkboxes to mark which specific products are affected by the ticket.
Child Tickets
View and manage tickets that are linked as children of the current ticket. Use the Merge function to combine duplicate tickets.
Tasks
Track activities and tasks related to the ticket. Task badges show active vs. total count (e.g. Tasks (1/3)).
Parameters
View and edit custom ticket parameters. The badge shows the number of parameters with values.
History
The History tab contains three sub-tabs:
- History — Full audit log of all changes made to the ticket.
- Employee History — Timeline of employee assignments and actions.
- Status History — Log of all status transitions.