Setting up VDF Synchronization in ShopCtrl
Once you have enabled integration in your Amazon account, you can set up Direct Fulfillment synchronization in ShopCtrl.
Before start: Configuring shop in ShopCtrl
Before enabling synchronization with Amazon Direct Fulfillment, please set up the corresponding shop currency, VAT tariffs, and payment types for your ShopCtrl shop.
Amazon sends customer names and addresses as single fields. Adjust the designated shop settings to process this data correctly.
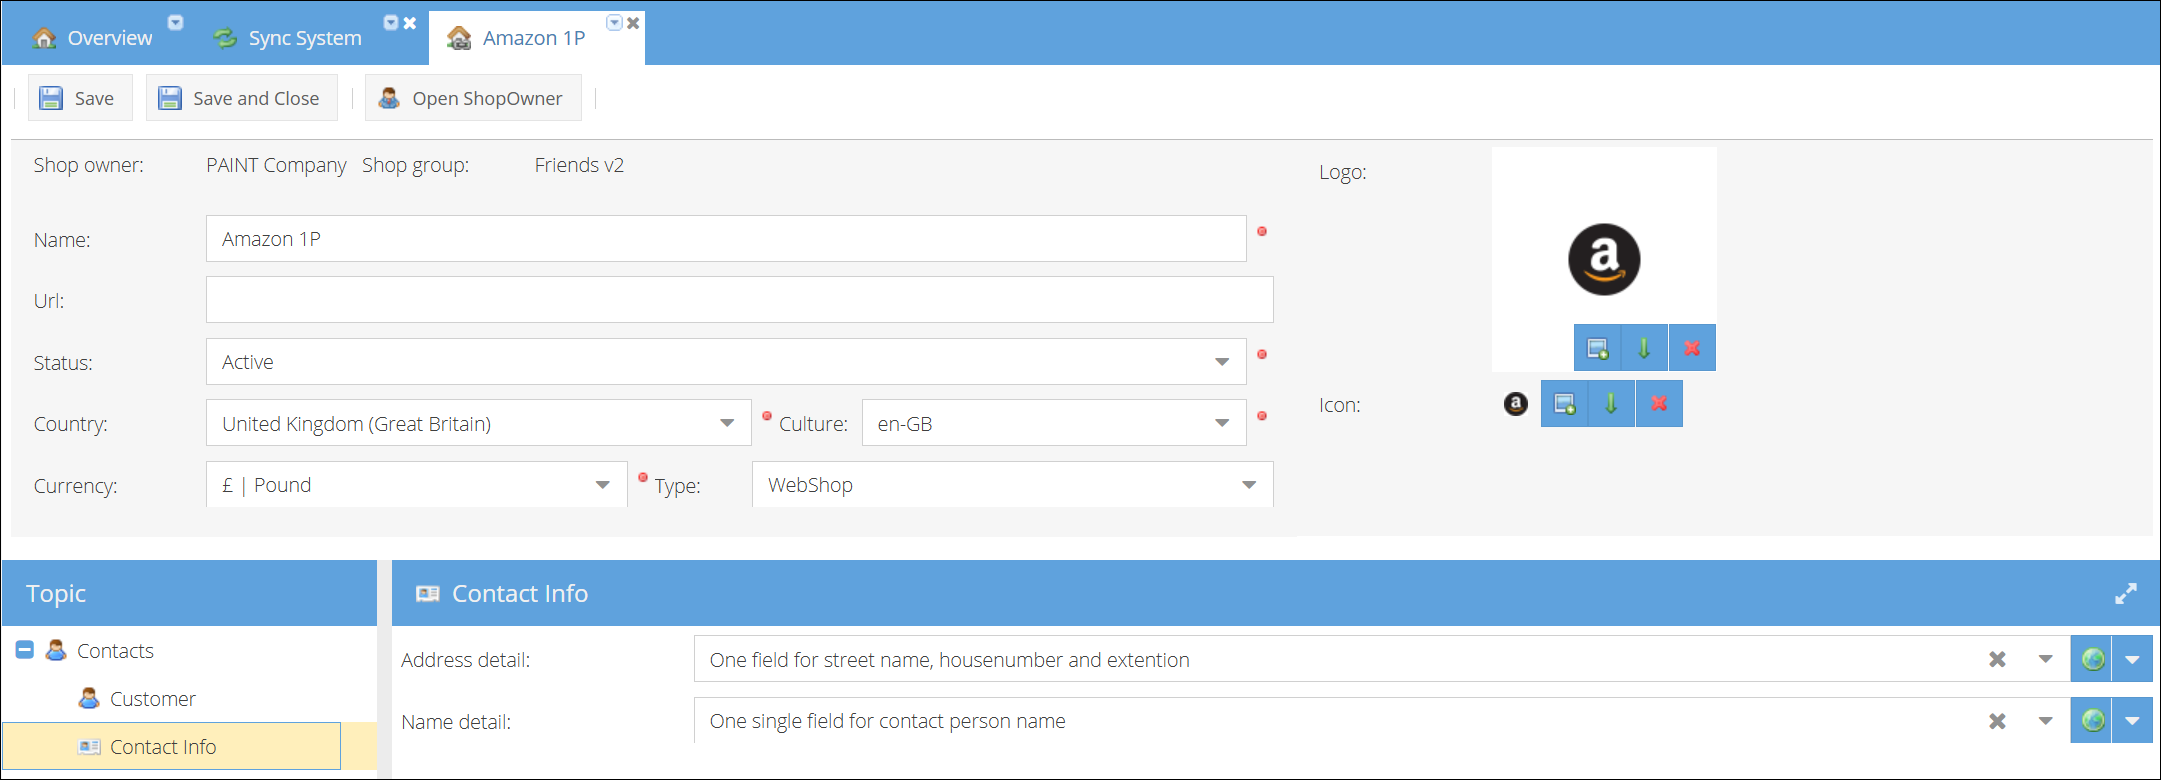
To change the way customer contact information will be stored in ShopCtrl:
- Log in to your ShopCtrl account as a user with the Shop Owner Admin role.
- Open the shop settings page for which the Amazon connection was established.
- Within the topic menu, expand the Contacts node and click Contact Info.
- Change the Address detail setting to One field for street name, house number and extension.
- Change the Name detail setting to One single field for contact person name.
- Click Save or Save and Close to apply changes to the shop.
Setting up Amazon Direct Fulfillment synchronization
We will break the setup process into the following steps:
- Create VDF Carrier Account
- Establish connection to Amazon SP-API
- Configure Order Sync Settings
- Configure warehouse and status mappings
- Enable synchronization features
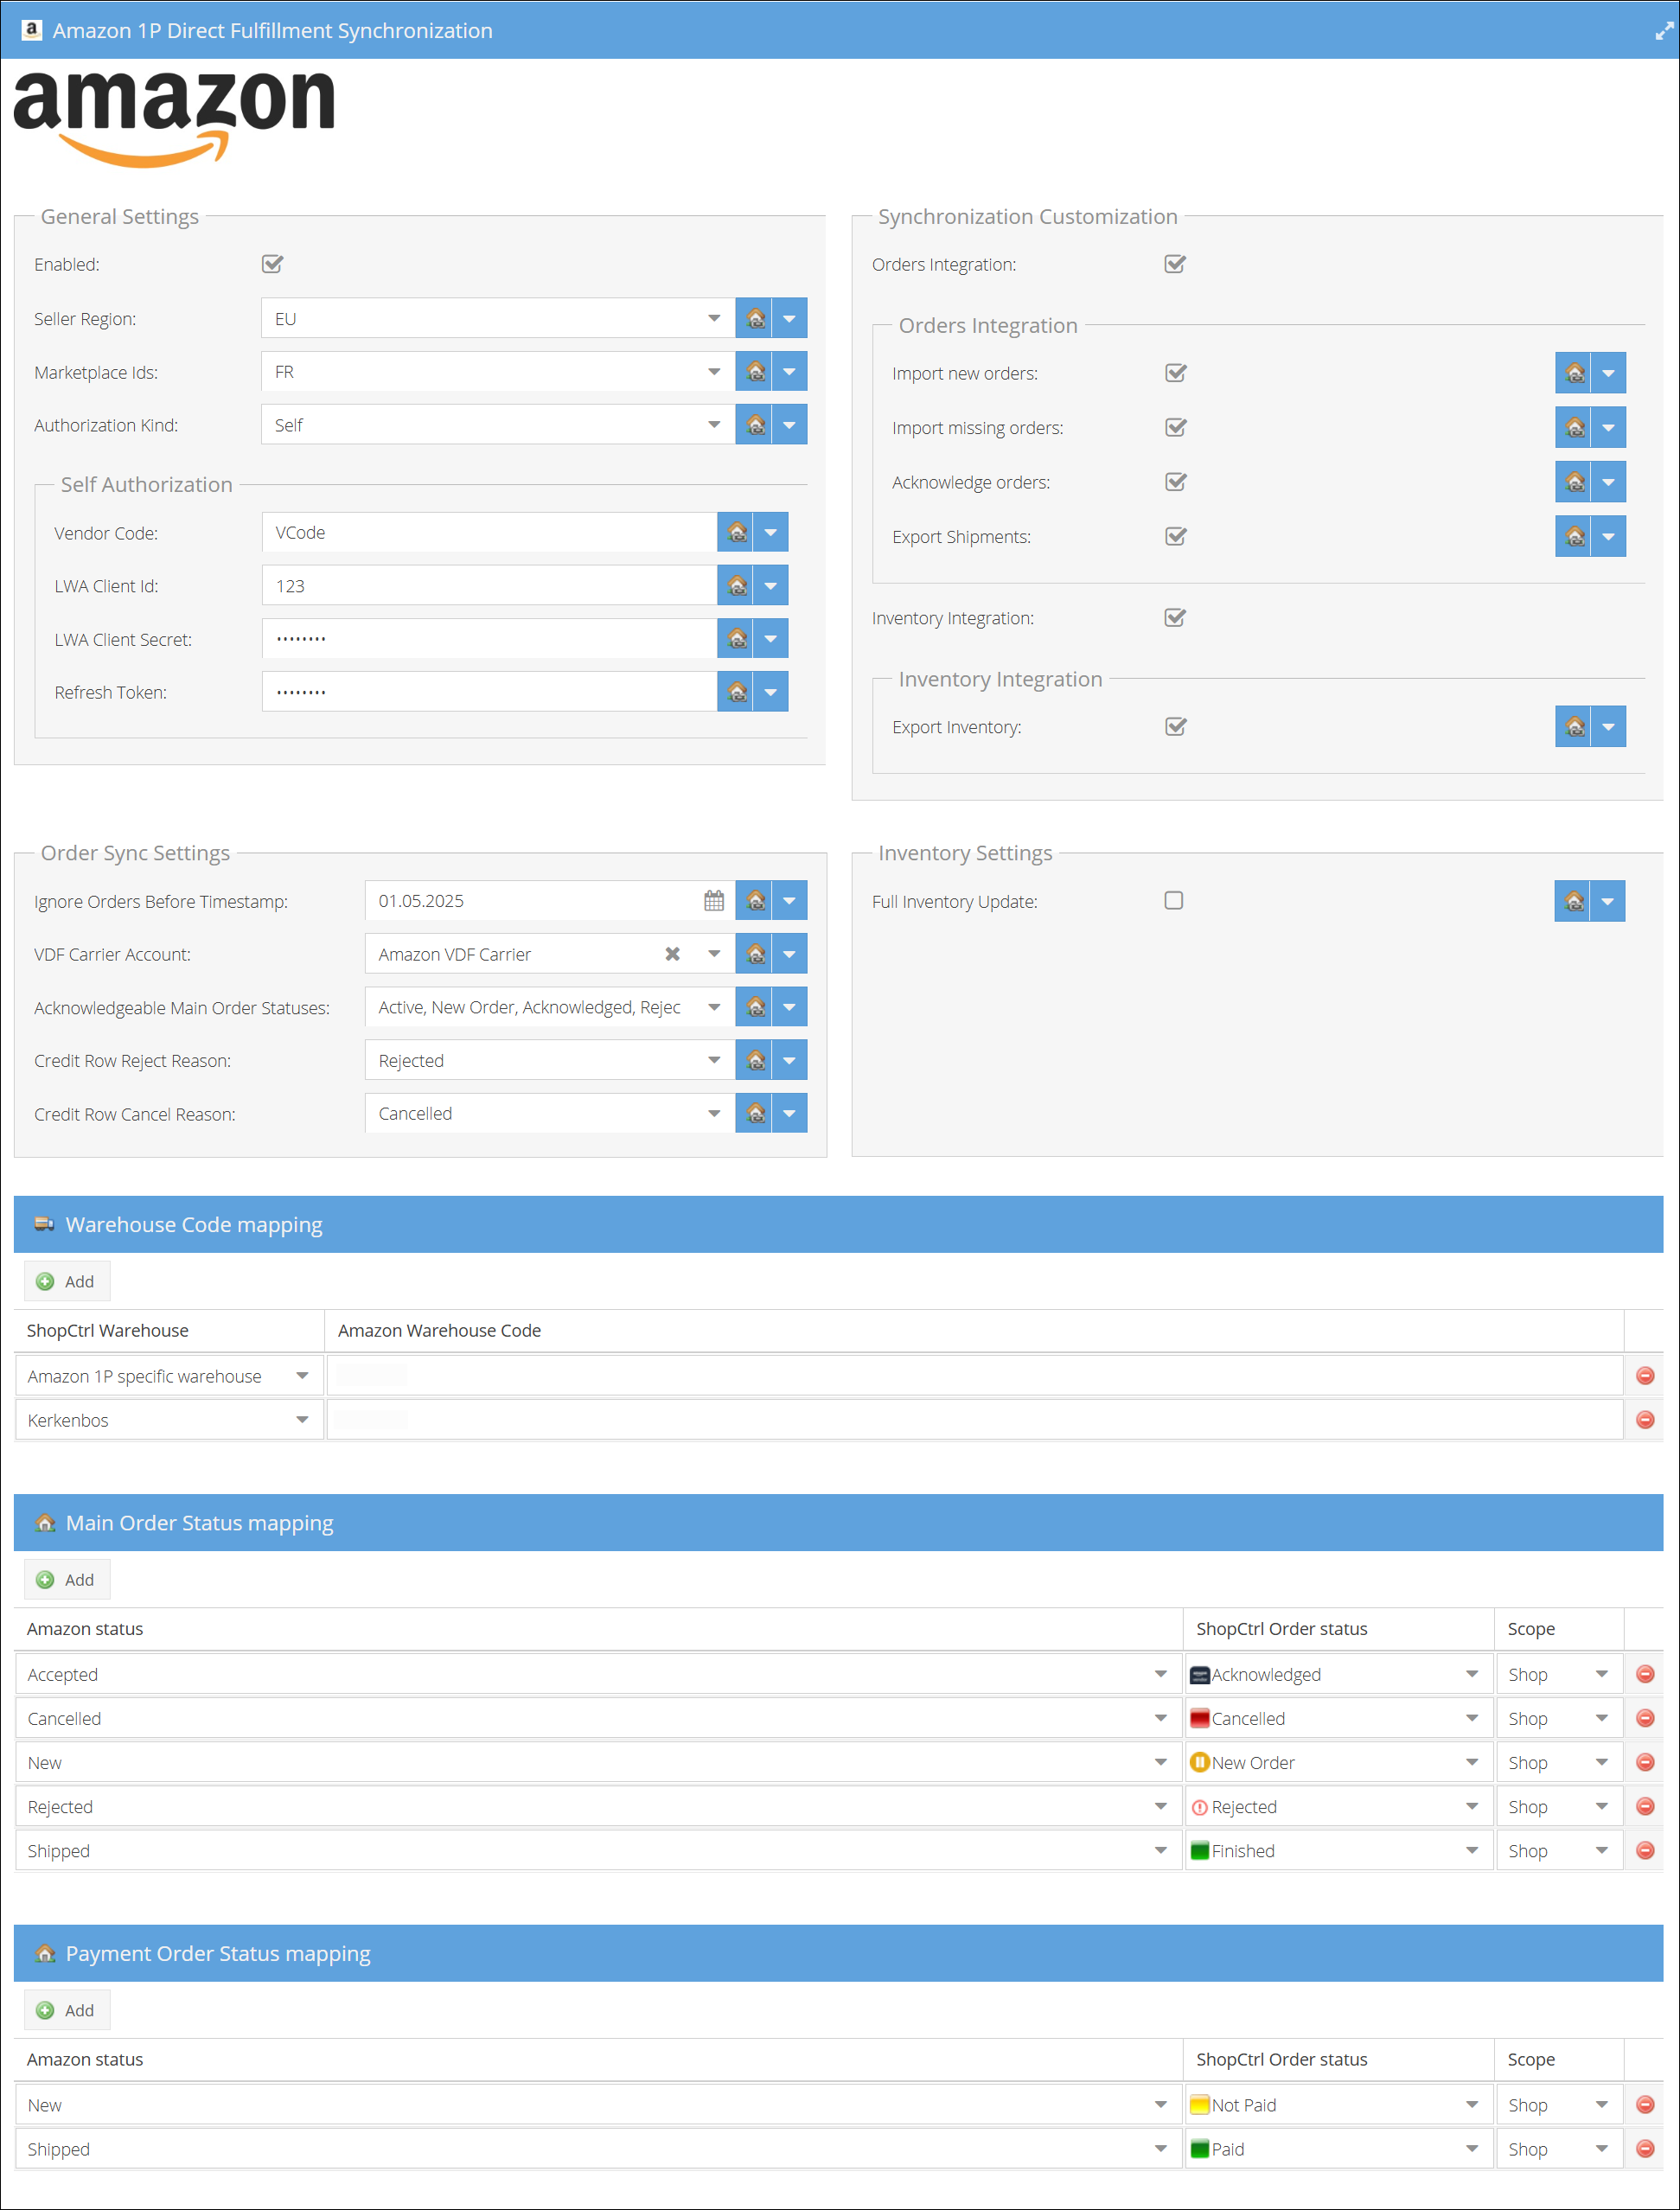
Show full shop settings
Step 1. Create VDF Carrier Account
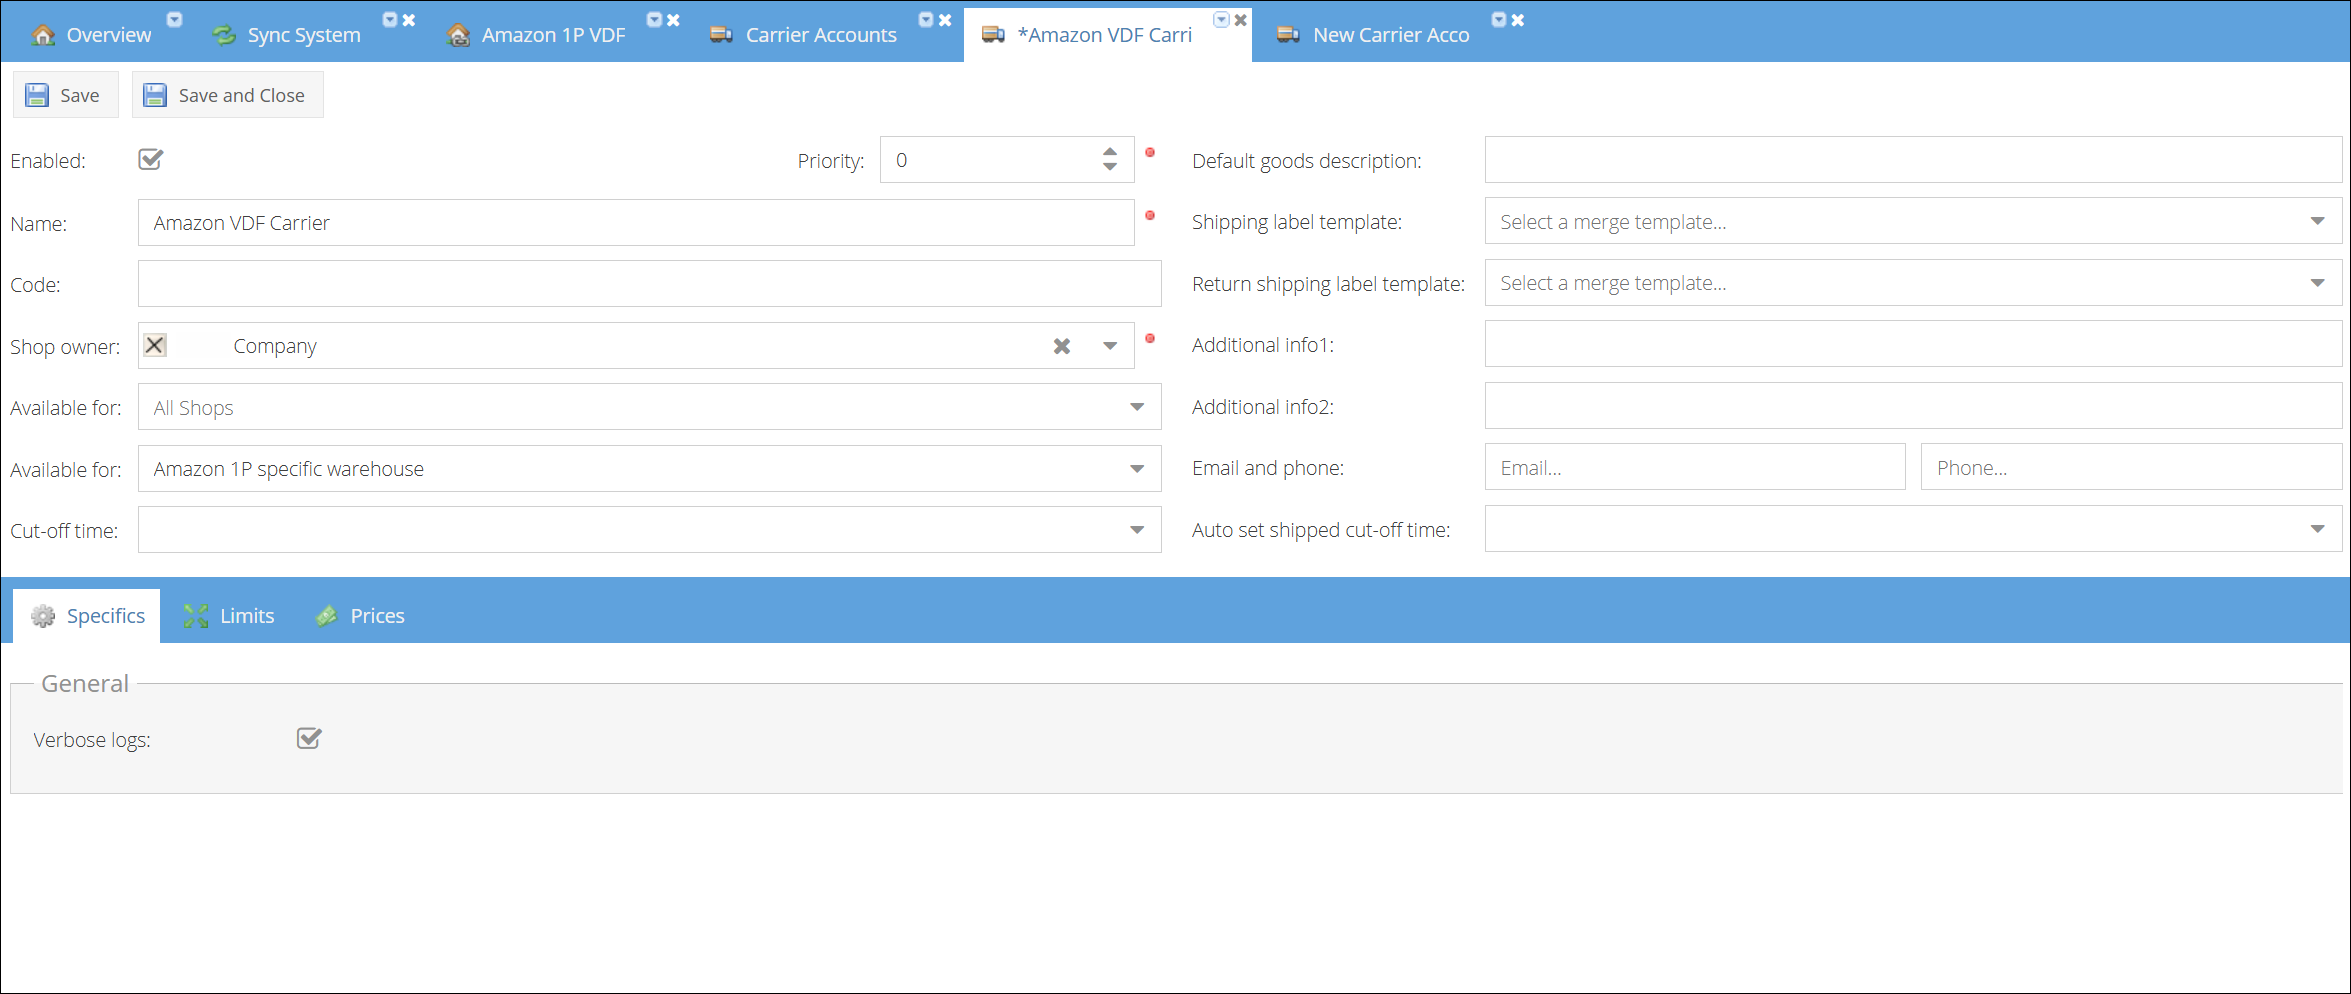
Before configuring the synchronization module, create the Amazon VDF carrier account so it can be selected in the shop settings later.
- Log in to ShopCtrl as a user with the Shop Owner Admin role.
- Navigate to Configuration > Carrier Accounts in the menu.
- Click Add new to create a new carrier account. Select "Amazon VDF Carrier" from the list of available integrations.
- Give the carrier account a recognizable name in the Name field (e.g. "Amazon VDF Carrier").
- Set Shop owner to your company and, under Available for, select the warehouse used for Amazon Direct Fulfillment.
- Click Save or Save and Close.
Step 2. Establish connection to Amazon SP-API
Connect your ShopCtrl shop to Amazon by providing your vendor credentials and API keys in the General Settings section.
- Navigate to Configuration > Shops in the menu to access the list of created shops.
- Choose a specific shop for which you want to configure Amazon Direct Fulfillment and click Edit to access shop settings.
- Within the topic menu, select Shop synchronization > Amazon 1P Direct Fulfillment Synchronization.
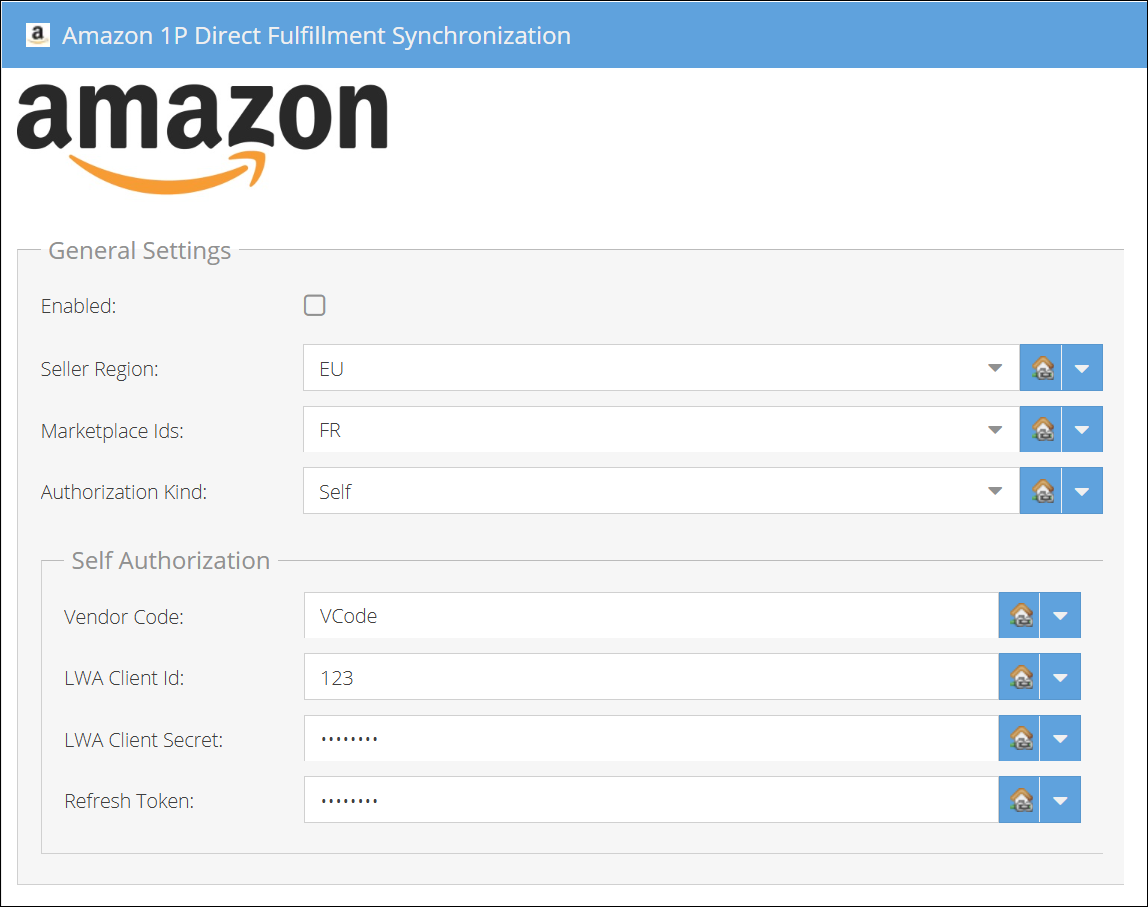
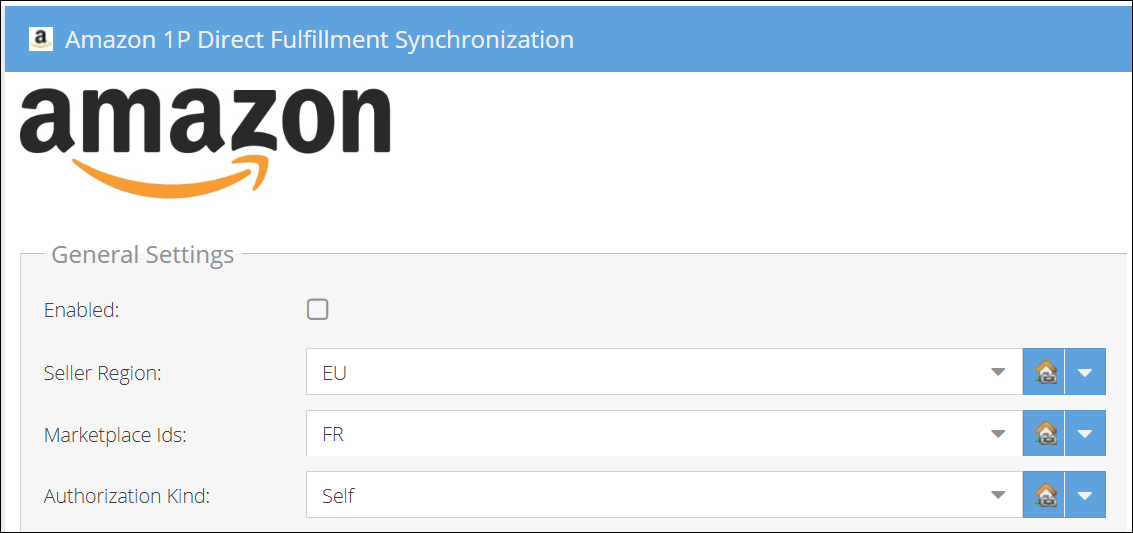
- Specify a Seller Region and Marketplace Ids from which you wish to import orders via this shop.
- Leave the Authorization Kind — Self.
- In the Self Authorization section, enter the Vendor Code.
- Provide the LWA Client Id and LWA Client Secret generated for the ShopCtrl private app on Amazon.
- Enter the Refresh Token.
- Click Save or Save and Close to apply changes to the shop.
You have now established the connection to Amazon, but no features have been turned on yet.
Step 3. Configure Order Sync Settings
In the Order Sync Settings section, define the order import cut-off and the rules for acknowledging orders back to Amazon.
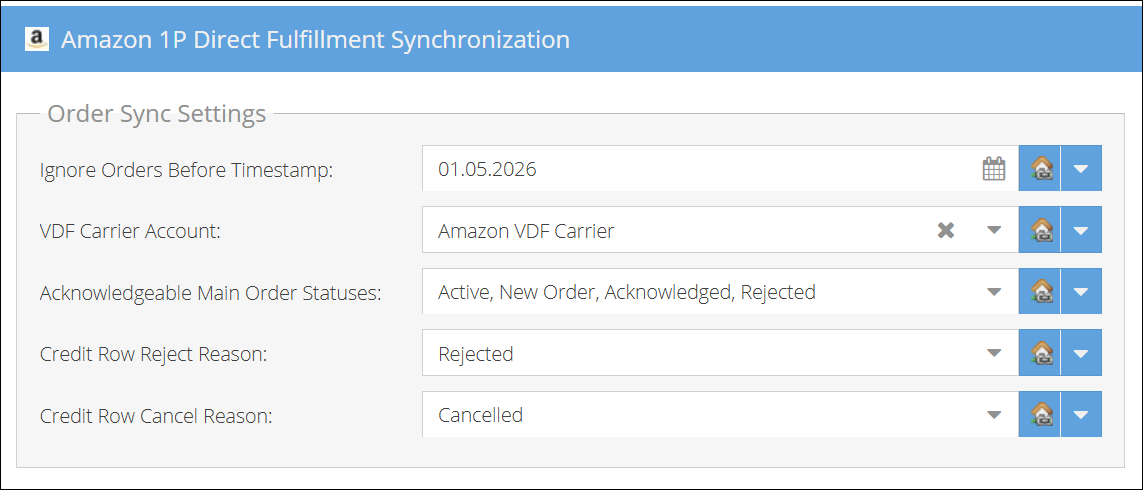
- Ignore Orders Before Timestamp: Set the date from which you want to start importing orders (e.g.
01.05.2026). This prevents older orders from being imported. - VDF Carrier Account: Select the carrier account created in Step 1. When an order is accepted, this carrier is automatically assigned to the order.
- Acknowledgeable Main Order Statuses: Choose which main order statuses allow the Accept and Reject buttons on the order detail page (e.g. Active, New Order, Acknowledged, Rejected). Orders are only acknowledged to Amazon when they are in one of these statuses.
- Credit Row Reject Reason: Select the credit reason used when rejecting orders. We suggest creating a "Rejected" credit reason if one does not exist yet.
- Credit Row Cancel Reason: Select the credit reason for cancelled orders. We suggest creating a "Cancelled" credit reason.
- Click Save or Save and Close to apply changes.
Direct Fulfillment order acknowledgement is all-or-nothing. Accepting an order confirms all order rows in full. Rejecting an order creates credit rows for the full quantity on every order row. Partial accept or reject is not supported.
Step 4. Configure warehouse and status mappings
The lower part of the page contains three mapping panels. Use the Add button in each panel to create a new mapping row.
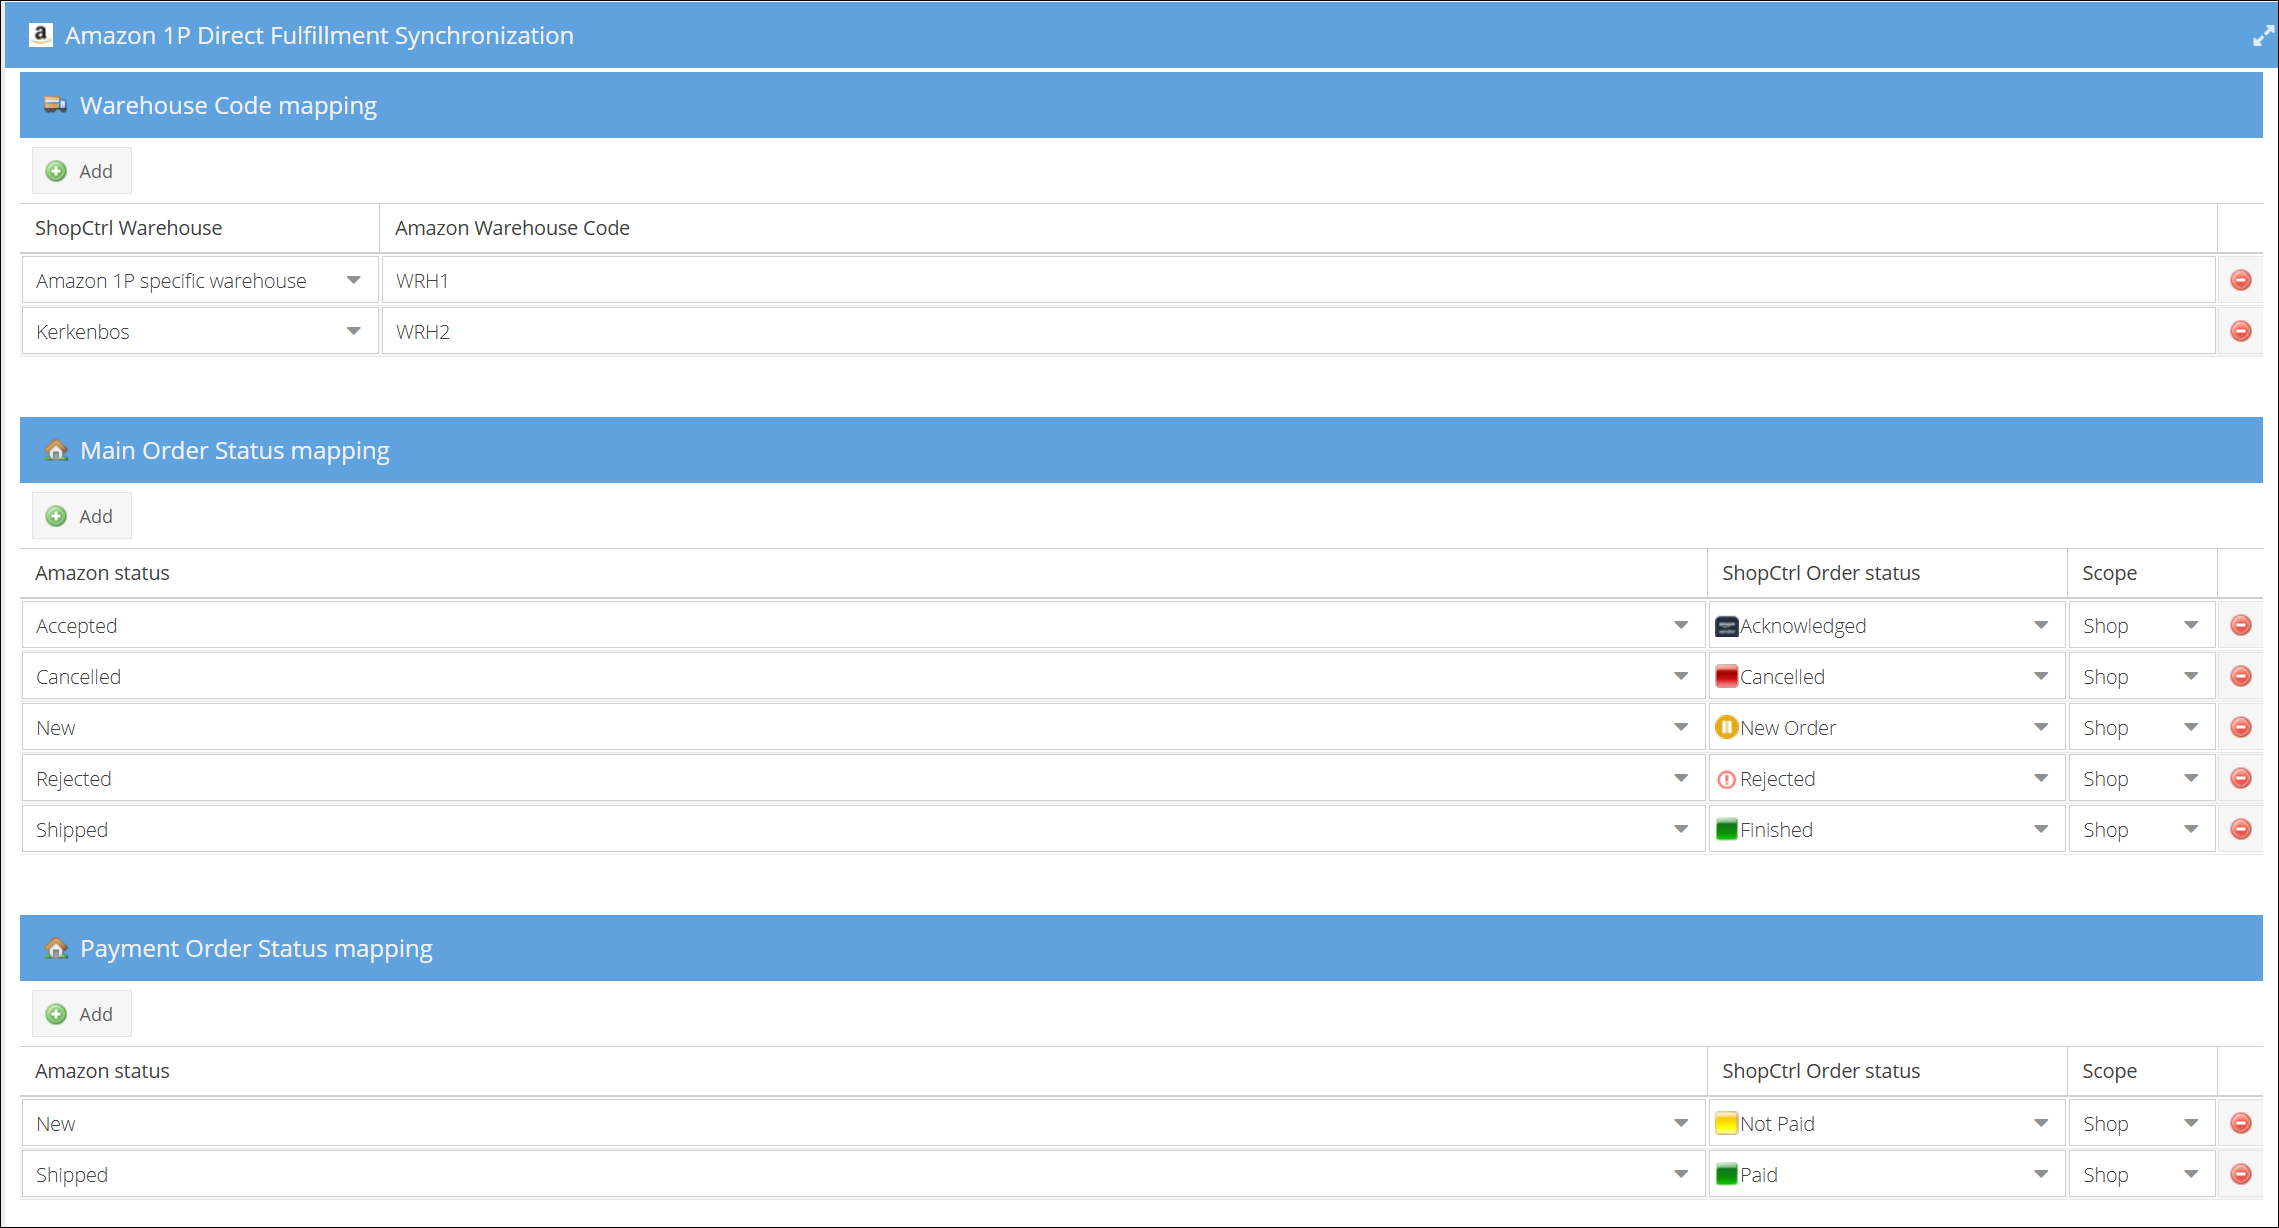
Warehouse Code mapping — map each ShopCtrl warehouse to its corresponding Amazon Warehouse Code so orders and inventory are routed to the correct location.
Main Order Status mapping — Amazon Direct Fulfillment order statuses are pre-mapped to ShopCtrl statuses by default. You can override these to match your workflow. The Scope column controls where the mapping applies (default: Shop). Default mappings:
| Amazon status | ShopCtrl Order status |
|---|---|
| Accepted | Acknowledged |
| Cancelled | Cancelled |
| New | New Order |
| Rejected | Rejected |
| Shipped | Finished |
Payment Order Status mapping — Amazon does not return payment status when retrieving orders via API, so payment status is derived from the order state. Default mappings:
| Amazon status | ShopCtrl Order status |
|---|---|
| New | Not Paid |
| Shipped | Paid |
Click Save or Save and Close to apply changes.
Step 5. Enable synchronization features
Use the Synchronization Customization pane (top-right of the page) to turn on the features you need. Enabling a master toggle activates its child options.
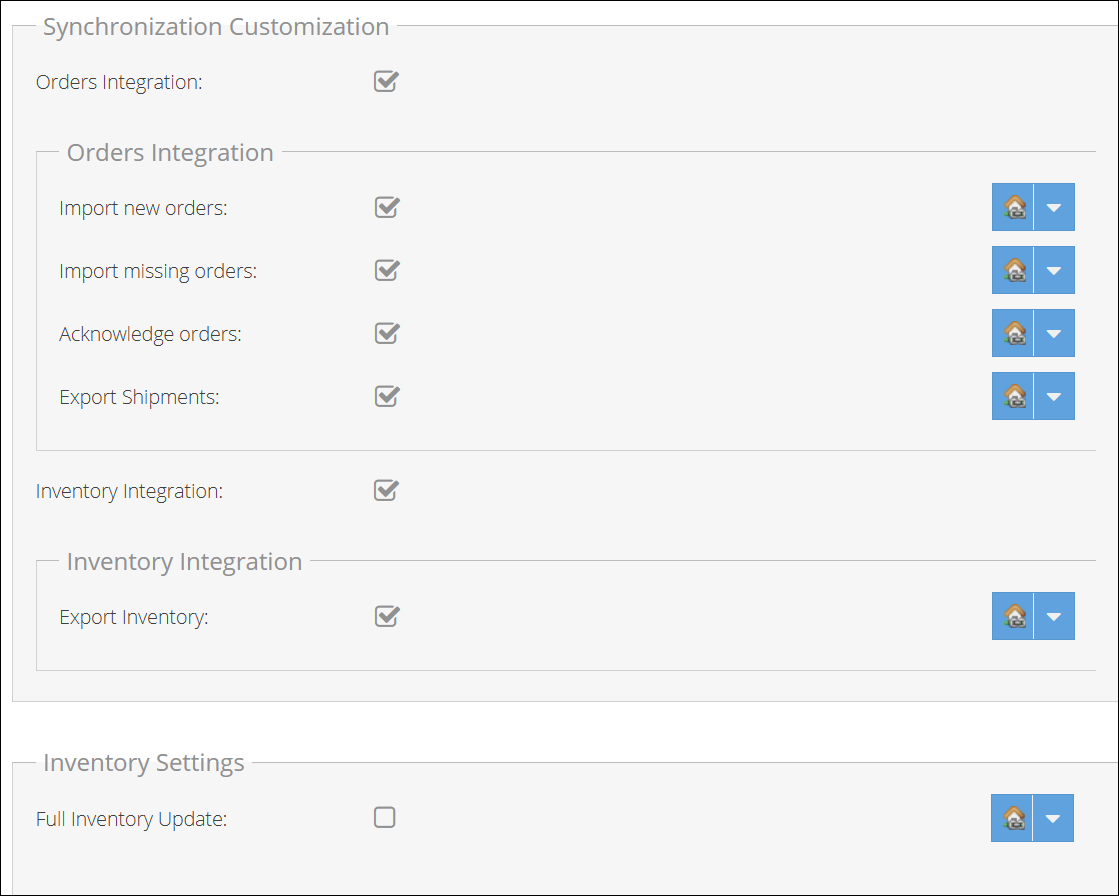
- Enable Orders Integration (master toggle), then select:
- Import new orders — ongoing synchronization of new orders.
- Import missing orders — imports any orders that may have been missed (recommended).
- Acknowledge orders — submits order accept/reject decisions back to Amazon (configured in Step 3).
- Export Shipments — submits shipment confirmations to Amazon after dispatch.
- To export stock levels, enable Inventory Integration (master toggle) and Export Inventory.
- Check the top-level Enabled toggle in the General Settings section. This master switch is what actually starts synchronization — once it is enabled, the configured features begin running in the background.
- Click Save or Save and Close to apply your configuration.
Completing the Setup
Once the configuration steps are finished and the module is enabled, your Direct Fulfillment integration is active. Amazon dropship purchase orders sync in the background automatically.
When an order arrives, it appears with the Dropship purchase type and a New status. From the order detail page, you can accept or reject the order, create a shipment, request shipping labels via the VDF carrier, and dispatch. Shipment confirmations are submitted to Amazon automatically after the shipment is marked as shipped.